
C# Deadlocks in Depth - Part 1

For me, multi-threading programming is one of the most fun things I do as a developer. It’s fun because it’s hard and challenging. And I also get a particular sense of satisfaction when solving deadlocks (you’ll see what I mean).
This series will go through understanding deadlocks, show common deadlock types, how to solve them, how to debug them and best practices to avoid them. In Part 1, I’ll show one of the easiest deadlock scenarios, how to debug it in Visual Studio and finally how to fix it. We’ll cover some of the basics, but I’ll move quickly to more advanced topics as well.
Defining a Deadlock
A deadlock in C# is a situation where two or more threads are frozen in their execution because they are waiting for each other to finish. For example, thread A is waiting on lock_1 that is held by thread B. Thread B can’t finish and release lock_1 because it waits on lock_2, which is held by thread A. Too confusing? I’ll show you an example in a moment, but
Brief explanation of Locks
A Lock is a way for us to synchronize between Threads. A lock is a shared object that can be Acquired by a
private static Singleton _instance = null;
private static readonly object _lock = new object();

public Instance GetInstance()
{
  lock (_lock)
  {
    if (_instance == null) _instance = new Singleton();
    return _instance;
  }
}
Without a lock, 2 threads might enter the critical section, ending up with 2 instances of our Singleton.
The example uses the lock statement
. A lock statement uses Monitor.Enter and Monitor.Exit under the hood. Another way to achieve locking is to use a Mutex or a Semaphore . We might talk about those as well.
Deadlock example 1: The Nested-Lock
public void Foo()
{
    object lock1 = new object();
    object lock2 = new object();
    Console.WriteLine("Starting...");
    var task1 = Task.Run(() =>
    {
        lock (lock1)
        {
            Thread.Sleep(1000);
            lock (lock2)
            {
                Console.WriteLine("Finished Thread 1");
            }
        }
    });

    var task2 = Task.Run(() =>
    {
        lock (lock2)
        {
            Thread.Sleep(1000);
            lock (lock1)
            {
                Console.WriteLine("Finished Thread 2");
            }
        }
    });

    Task.WaitAll(task1, task2);
    Console.WriteLine("Finished...");
}
Explanation of the code:
- Two objects are created for lock purposes. In C#, any object can be used as a lock.
- Task.Run starts 2 Tasks, which are run by 2 Threads on the Thread-Pool.
- The first Thread acquires lock1 and sleeps for 1 second. The second acquires lock2 and also sleeps for a second. Afterward, thread 1 waits for lock2 to be released and thread 2 waits for lock1 to be released. So they both wait indefinitely and result in a Deadlock.
- Task.WaitAll(task1, task2) waits on the method’s Thread until both Tasks are finished, which never happens. This makes it a 3-Thread deadlock. The Console print is: Starting…
Debugging a Deadlock
You can see the deadlock in the debugger easily, once you know what to look for. In the example above, running the code in Visual Studio results in a hang. Hit on the Debug | Break All (Ctrl + Alt + Break), then go to Debug | Windows | Threads. You’ll see the following:
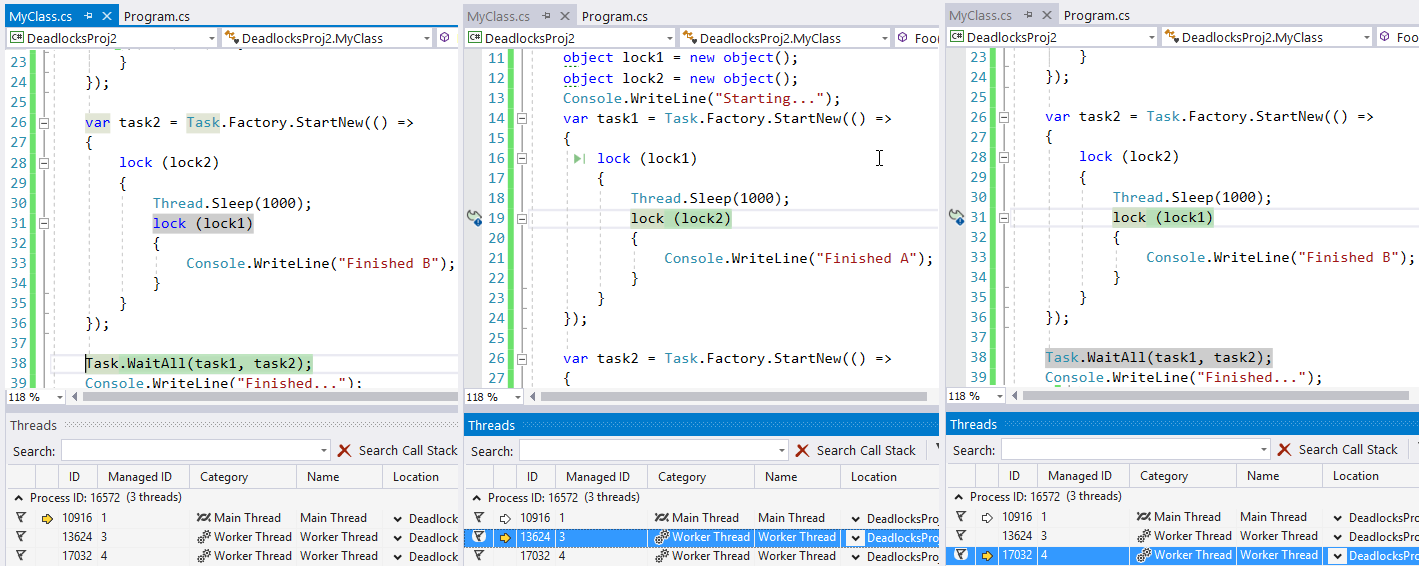
This is how a deadlock looks like in debugging. As you can see, the Main Thread (on the left) is stuck on Task.WaitAll() . The other 2 Threads are stuck on the inner lock statement. In fact, to recognize deadlocks, you should look for Threads stuck on one of the following:
- lock statements
- WaitOne() methods when working with AutoResetEvent, Mutex, Semaphore, EventWaitHandle.
- WaitAll() and WaitAny() when working with Tasks.
- Join() when working with Threads.
- .Result
and . GetAwaiter().GetResult() when working with Tasks. - Dispatcher.Invoke() when working in WPF.
When you see the debugger’s execution point stuck on any of the above, there’s a big chance you have a deadlock. We’ll see in following parts of this series examples of deadlocks with most, if not all of those statements.
Solving the Nested-Lock Deadlock
Now that you recognized the deadlock, it’s time to solve it. There are several ways to go about it. The obvious one being: don’t use a lock within a lock. That’s not always possible though. For example, let’s say each lock represents an Account. We want to use the lock on each operation on the account. When we do an operation with both accounts (like a Transfer), we want to lock both of them.
Solution #1 – Nest the locks in the same order
If we nest the locks in the same order, there’s not going to be a deadlock. Let’s change the code in our example a bit to mimic the Account Locking problem:
// Before: (with deadlock)
internal class TransferManager
{
    public void DoDoubleTransfer(Account acc1, Account acc2)
    {
        Console.WriteLine("Starting...");
        var task1 = Transfer(acc1, acc2, 500);
        var task2 = Transfer(acc2, acc1, 600);
        Task.WaitAll(task1, task2);
        Console.WriteLine("Finished...");
    }

    private Task Transfer(Account acc1, Account acc2, int sum)
    {
        var task = Task.Run(() =>
        {
            lock (acc1)
            {
                Thread.Sleep(1000);
                lock (acc2)
                {
                    Console.WriteLine($"Finished transfering sum {sum}");
                }
            }
        });
        return task;
    }
}
Now, to solve it by nesting the locks in the same order, we need to change:
// After (without deadlock, change only in "Transfer" method)
public class Account
{
    public uint Id { get; set; }
}
// ...
private Task Transfer(Account acc1, Account acc2, int sum)
{
    var lock1 = acc1.Id < acc2.Id ? acc1 : acc2;//smalled Id account
    var lock2 = acc1.Id < acc2.Id ? acc2 : acc1;//biggest Id account
    var task = Task.Run(() =>
    {
        lock (lock1)
        {
            Thread.Sleep(1000);
            lock (lock2)
            {
                Console.WriteLine($"Finished transferring sum {sum}");
            }
        }
    });
    return task;
}
Since the outer lock is going to be the same in all transfers, there’s no deadlock. One of the Threads is going to wait in the outer lock until the first Thread finishes, then go on.
Solution #2 – Use Timeout
Another way to solve this is to use a Timeout when waiting for a lock to be released. If the lock isn’t released within some time, the operation is canceled. It can be moved back to an operation queue or something similar and executed at a later time. Or just try again after a small delay.
private Task Transfer(Account acc1, Account acc2, int sum)
{
    var task = Task.Run(() =>
    {
        while (true)
        {
            try
            {
                bool entered = Monitor.TryEnter(acc1, TimeSpan.FromMilliseconds(100));
                if (!entered) continue;
                entered = Monitor.TryEnter(acc2, TimeSpan.FromMilliseconds(100));
                if (!entered) continue;

                //do operation
                Console.WriteLine($"Finished transferring sum {sum}");
                break;
            }
            finally
            {
                if (Monitor.IsEntered(acc1)) Monitor.Exit(acc1);
                if (Monitor.IsEntered(acc2)) Monitor.Exit(acc2);
                Thread.Sleep(200);
            }
        }
    });
    return task;
}
Remember, we said that the lock statement is actually Monitor.Enter() and Monitor.Exit() under the hood. When using those methods, it’s possible to pass a Timeout as a parameter. This means that if the locked failed to Acquire within the Timeout, False is returned.
In our case, we try to acquire both locks. If acquiring fails, we simply release both and try again. Theoretically, it might be possible with this method to always fail to do an operation – When both Threads acquire the outer lock at exactly the same time, then fail to acquire the inner lock. But, in
It’s worth mentioning that modern applications with Transfer type of operations can avoid locks entirely by using patterns like Event Sourcing .
Summary
In this part, we talked a bit about locks, saw one type of deadlock, how to debug it and 2 ways to solve it.
As a best practice, be very suspicious when using locks inside other locks. This might be missed since the entire method can be within a locked context. Another best practice is if you do need to use a lock, place as little code as possible inside.
This is going to be a 2-part or 3-part series, I’m not sure yet. In the next part(s), I’ll show some of the more common deadlocks and more sophisticated ways to debug them.
Here’s a little spoiler deadlock from the next part of the series:
public partial class MainWindow : Window
{
    public MainWindow()
    {
        InitializeComponent();
    }

    private void OnButtonClick(object sender, RoutedEventArgs e)
    {
        var task = Task.Run(() =>
        {
            Console.WriteLine("Operation on another thread");
            Dispatcher.Invoke(() =>
              MyTextBox.Text = "operation finished");
        });
        Task.WaitAll(task);
    }
}
Did you get that particular satisfaction that comes along with solving deadlock? If you did, check out the C# Deadlocks in Depth Part 2 . And I’d love it if you subscribe to the blog and be notified of more in-depth C# articles. Happy coding.


