One of the most impressive productivity tools in .NET development is ReSharper . I keep getting blown away by its capabilities with each release. Don’t get me wrong here, I love Visual Studio, and it’s getting immensely better as well. But whenever I think Visual Studio caught up, I discover some new amazing feature that leaves me dependent on ReSharper and Rider yet again.
So in this blog post, I’ll tell you about 6 of ReSharper’s more addicting features. Those that you might not have known about, but won’t be able to live without once you do.
1. Ctrl + T, Ctrl + T + T, Ctrl + T + T + T
You all know the excellent Ctrl + T command, which allows you to quickly find fields, files, and types. You might not have known, however, that you can click the T button once or twice more. Which makes it Ctrl + T + T and Ctrl + T + T + T. The first option allows you to search just for types.

The second option Ctrl + T + T + T allows you to search for any text in your solution. Kind of like Visual Studio’s Ctrl + Shift + F, only nicer (in my humble opinion).

2. Opening Ctrl + T results as a list
Navigation in a huge application can be pretty difficult. You don’t always remember the exact field name you’re looking for. Or you might remember you’re looking for something with the word Home, but the number of fields and classes fitting that search is huge. Using Ctrl + T shows just the first amount of results fitting in one screen. But if you search for something and hit Shift + Enter, you’ll see all results in a tool window. Just so:
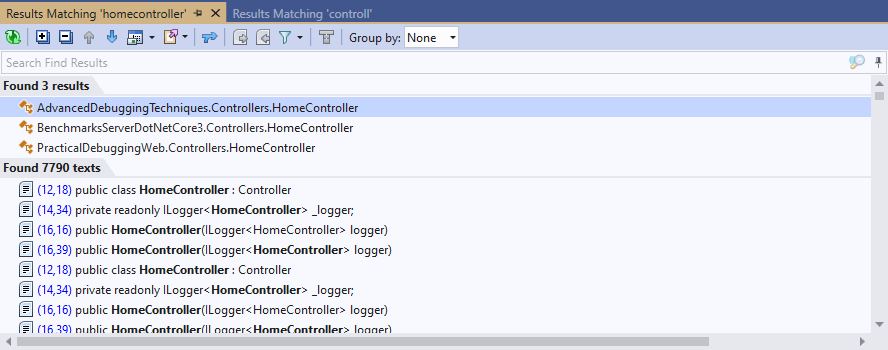
Now you can scroll over quickly or filter within these results to find what you meant. This is so convenient I don’t feel I even deserve it.
3. Value Origin, Value Destination
This next feature is so addicting that once you start using it, you won’t be able to stop.
ReSharper allows you to inspect any variable and see all possible call stacks where you can get it from (as a parameter) and where it’s going (as an argument). Let’s start with where you got it from. To use the feature, either use the Ctrl + Alt + Shift + A shortcut for Inspect this or find Inspect in the right-click context menu.

Clicking on Value Origin will show all possible paths to how recording could have been received. Like so:

In this case, we got it as a parameter in the method ShouldStopRecording, which could have gotten it from any of the methods AddRecordingResult, ContinueRecording, GetLastRecording, or GetRunningSessions.
To see all possible destinations of the recording variable, click on Value Destination, which will show:

This shows all the places this variable is going to be used or passed as an argument hence on. In this case, you can see that it’s used only in ShouldStopRecording to access its properties.
Both of these features make it really easy to get around in code. Instead of using Find all references, or Find usages, which go by methods, you’ll be able to find the path to a specific variable.
4. Postfix completion templates
You all know about Visual Studio snippets. And if you don’t, check out my other article 5 Productivity Tips in Visual Studio That You Should Know . ReSharper has a similar feature that allows you to insert an expression into a template after you already typed it. Here’s an example.

Once I hit Enter or Tab, ReSharper automatically creates a foreach statement.

This trick can be used for any collection.
Here’s another example:

Selecting the if postfix will create the following statement:

There are a bunch of these and you can see the full list here .
5. Solution-Wide Analysis
With solution-wide analysis, ReSharper constantly analyzes your entire solution and smartly finds errors and warnings. These are both compilation errors and runtime errors. R# is smart that way. This can be used as a sort of sanity health check. Whenever you’re refactoring a lot of code, this feature is really useful to make sure you’re not doing any mistakes. Any obvious mistakes that is—R# doesn’t find logical bugs instead of the developer just yet.
Here’s how it looks like:
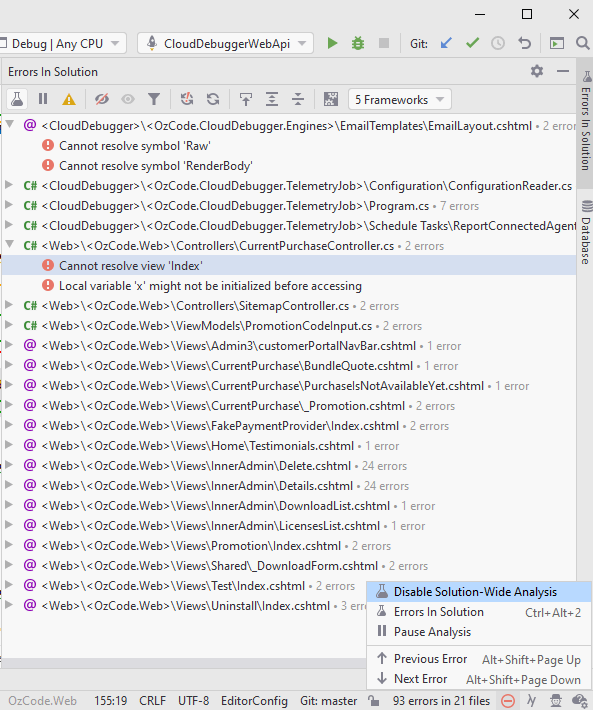
Solution-wide analysis is turned off by default for good reasons. It eats up performance. At least when using Visual Studio + ReSharper. If you’re using Rider, on the other hand, you probably won’t even notice it’s on.
6. Extract Class
One of the most impressive things about ReSharper is its refactor capabilities. Most of them can be accessed from the Refactor This menu available with the Ctrl + Shift + R shortcut. One of the refactorings I like most is Extract Class. It will extract members like fields, properties, and methods into a new class, which will be created as a field in the original class. Here’s an example:
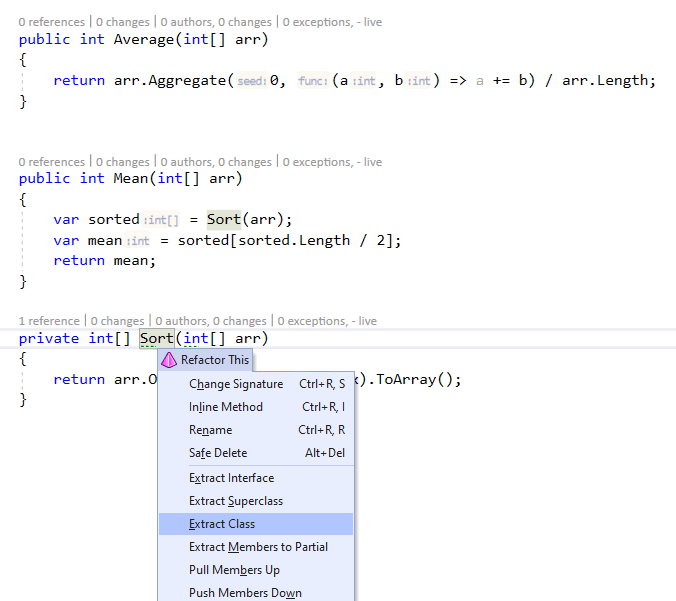
When clicking Ctrl + Shift + R on the member Sort, the following dialog appears:
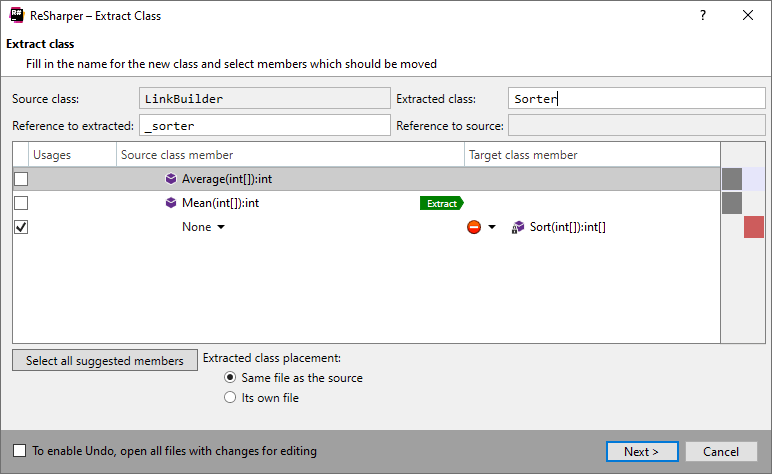
Here you can pick and choose which members you want to extract. R# helps you by showing usages. In the example above, Mean uses Sort and you can extract them together.
Once you choose the name of the extracted class (I chose Sorter) and the name of the reference to the extracted (_sorter), you’ll get this result:
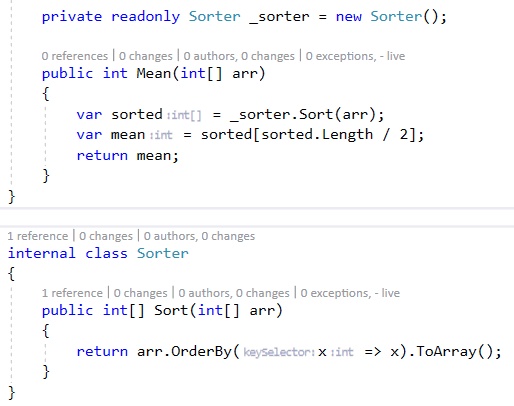
This makes the all too common action of breaking up a big class into smaller classes much easier.
That’s it for this one, happy coding.


One really cool feature I also love is that you can move around statements, parameter (R# offers after that to apply the new order to the usages as well), methods using CTRL+ALT+Shift + arrow keys
That's really cool!