
Reusing UI components in WPF: A case study

In WPF you can do everything in many different ways. It’s not always clear what is better. For example, we got many different ways to reuse a UI component. We can use Templates, User controls, Custom controls, ViewModels with data templates and so on. So which is better? The answer is obvious. Always use user controls!
Just kidding 🙂 The answer is always different, depending on your specific scenario. And a lot of times, it’s far from obvious what’s better. Just for the fun of it, let’s explore one of those scenarios where it’s not so clear which is better.
The Challenge
Let’s say we are doing some sort of sign-up form in our App. We want, for starters: Name, Zip code and Birthday. And some sort of validation. As far as the UI, I want it to look something like this:
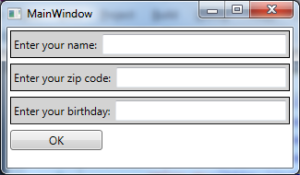

As you can see, in addition to programming, I also possess killer UI / UX skills 🙂
When clicking OK, the text boxes should become green or red, according to validation.
- Name should not be empty and contain at least 3 characters.
- Zip code should be 5 digits.
- Birthday should be a date format.
NOTE: WPF does have infrastructure for text validation. But, for the sake of this case study, let’s assume we can’t use it.
Now, let’s see in how many ways we can do this with WPF, and even try to figure out which is better.
Copy-paste, Copy-paste, Copy-paste
Who needs reuse anyway, right? Here’s our first draft of the code:
<Window x:Class="CustomCtrlOrUserOrDataTemplate.MainWindow"
…
        >
        <StackPanel>
            <Border Background="LightGray" BorderBrush="Black" Margin="3"
                    BorderThickness="1">
                <DockPanel >
                    <TextBlock DockPanel.Dock="Left" Text="Enter your name:"
                               Margin="3" VerticalAlignment="Center"/>
                    <TextBox  Margin="3" x:Name="NameTextBox"/>
                </DockPanel>
            </Border>

            <Border Background="LightGray" BorderBrush="Black" Margin="3" BorderThickness="1">
                <DockPanel >
                    <TextBlock DockPanel.Dock="Left" Text="Enter your zip code:" Margin="3" VerticalAlignment="Center"/>
                    <TextBox  Margin="3" x:Name="ZipTextBox"/>
                </DockPanel>
            </Border>

            <Border Background="LightGray" BorderBrush="Black" Margin="3" BorderThickness="1">
                <DockPanel >
                    <TextBlock DockPanel.Dock="Left" Text="Enter your birthday:"
                               Margin="3" VerticalAlignment="Center"/>
                    <TextBox  Margin="3" x:Name="BirthdayTextBox"/>
                </DockPanel>
            </Border>
            <Button Width="100" HorizontalAlignment="Left" Click="OnOKClick"
                    Margin="3">OK</Button>
        </StackPanel>
</Window>
The code behind looks like this:
public partial class MainWindow : Window
{
    public MainWindow()
    {
        InitializeComponent();
    }

    private void OnOKClick(object sender, RoutedEventArgs e)
    {
        CheckName();
        CheckZip();
        CheckBirthday();
    }

    private void CheckName()
    {
        var name = NameTextBox.Text;
        if (name == null || name.Length <= 3)
            ShowAsError(NameTextBox);
        else
            ShowAsSuccess(NameTextBox);
    }

    private void CheckZip()
    {
        var zip = ZipTextBox.Text;
        if (zip == null || zip.Length != 5)
        {
            ShowAsError(ZipTextBox);
            return;
        }
        int n;
        bool number = int.TryParse(zip, out n);
        if (number)
            ShowAsSuccess(ZipTextBox);
        else
            ShowAsError(ZipTextBox);
    }

    private void CheckBirthday()
    {
        var birthday = BirthdayTextBox.Text;
        DateTime dt;
        bool isDate = DateTime.TryParse(birthday, out dt);
        if (isDate)
            ShowAsSuccess(BirthdayTextBox);
        else
            ShowAsError(BirthdayTextBox);
    }

    private void ShowAsError(TextBox tb)
    {
        tb.Background = Brushes.IndianRed;
    }

    private void ShowAsSuccess(TextBox tb)
    {
        tb.Background = Brushes.LightGreen;
    }
}
This is all nice and simple, but to add anything I need to make every change 3 times. And if I have 10 of these fields, and I’ll want to make my UI prettier by changing the border… I’ll need to do it 10 times. Besides all that, this article is about reuse. Let’s continue to see how we can do some reuse with Resources.
Approach #1: XAML reuse with the Resource system
WPF allows to save our XAML snippet as a Resource. And of course, as WPF goes, we can do that in several ways.
- We can create the view itself as a resource with x:Shared attribute*.* I won’t cover it because it’s not recommended and we can’t add functionality to that code. You can see an example here .
- We can create a ControlTemplate or DataTemplate as a resource. You can have your view inside the template and it will copy itself with each use. Let’s see that in action.
Our main window’s new code will be:
<Window ...>
  <Window.Resources>
    <ControlTemplate x:Key="FieldTemplate" >
      <Border Background="LightGray">
        <DockPanel >
          <TextBlock DockPanel.Dock="Left" Text="Enter your name:"/>
          <TextBox  Margin="3"/>
        </DockPanel>
      </Border>
    </ControlTemplate>
  </Window.Resources>
  <StackPanel>
    <Control Template="{StaticResource FieldTemplate}"/>
    <Control Template="{StaticResource FieldTemplate}"/>
    <Control Template="{StaticResource FieldTemplate}"/>
    <Button Width="100" Click="OnOKClick" >OK</Button>
  </StackPanel>
</Window>
The result of this is:
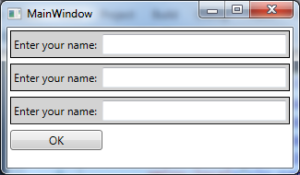
What happened here is by setting Template of our control we told WPF how our control should be rendered (How it should look like). However our template has the same text “Enter your name:” each time. We need some kind of ability to pass parameter to each Control. Something like this:
<Control Text=”Enter your zip code:” Template=”{StaticResource FieldTemplate}”/>
When writing ControlTemplate as we did, we can use {TemplateBinding XXX} to refer to properties of our Control. Unfortunately Control doesn’t have Text property. We can use Tag property each control has but instead I’ll change to ContentControl and use the Content property. I think it’s more readable this way.
<Window ...>
  <Window.Resources>
    <ControlTemplate x:Key="FieldTemplate" TargetType="ContentControl">
      <Border Background="LightGray" >
        <DockPanel >
          <TextBlock DockPanel.Dock="Left" Text="{TemplateBinding Content}" />
          <TextBox />
        </DockPanel>
      </Border>
    </ControlTemplate>
  </Window.Resources>
  <StackPanel>
    <ContentControl Content="Enter your name:"
       Template="{StaticResource FieldTemplate}" x:Name="NameControl"/>
    <ContentControl Content="Enter your zip code:"
       Template="{StaticResource FieldTemplate}" x:Name="ZipControl"/>
    <ContentControl Content="Enter your birthday:"
       Template="{StaticResource FieldTemplate}" x:Name="BirthdayControl"/>

    <Button Width="100" HorizontalAlignment="Left" Click="OnOKClick" Margin="3">OK</Button>
  </StackPanel>
</Window>
The result of this will be:
This is halfway to actual Custom Controls. With custom controls, we add our own new properties and then use them in the ControlTemplate with {TemplateBinding XXX} .
So how will we do our validation logic? We have access to our ContentControl since we gave a unique x:Name to each of them. From there we need access to our TextBox for the input, and to the TextBoxt to change the background according to validation result to Red or Green.
What I can do is use Binding and ContentControl’s properties Tag and Background to both get the input of the TextBox and to change the background. The result looks a little bit like magic.
<Window ...>
  <Window.Resources>
    <ControlTemplate x:Key="FieldTemplate" TargetType="ContentControl">
      <Border Background="LightGray">
        <DockPanel >
          <TextBlock DockPanel.Dock="Left" Text="{TemplateBinding Content}"/>
          <TextBox  Margin="3" Background="{TemplateBinding Background}"
             Text="{Binding Tag, RelativeSource={RelativeSource TemplatedParent}}"/>
        </DockPanel>
      </Border>
    </ControlTemplate>
  </Window.Resources>
  <StackPanel>
    <ContentControl Content="Enter your name:" x:Name="NameControl"
           Template="{StaticResource FieldTemplate}" />
    <ContentControl Content="Enter your zip code:" x:Name="ZipControl"
           Template="{StaticResource FieldTemplate}" />
    <ContentControl Content="Enter your birthday:" x:Name="BirthdayControl"
           Template="{StaticResource FieldTemplate}" />

    <Button Width="100" Click="OnOKClick">OK</Button>
  </StackPanel>


</Window>
Code-behind:
public partial class MainWindow : Window
    {
        public MainWindow()
        {
            InitializeComponent();
        }

        private void OnOKClick(object sender, RoutedEventArgs e)
        {
            CheckName();
            CheckZip();
            CheckBirthday();
        }

        private void CheckName()
        {
            var name = NameControl.Tag?.ToString();
            if (name == null || name.Length <= 3)
                ShowAsError(NameControl);
            else
                ShowAsSuccess(NameControl);
        }

        private void CheckZip()
        {
            var zip = ZipControl.Tag?.ToString();
            if (zip == null || zip.Length != 5)
            {
                ShowAsError(ZipControl);
                return;
            }
            int n;
            bool number = int.TryParse(zip, out n);
            if (number)
                ShowAsSuccess(ZipControl);
            else
                ShowAsError(ZipControl);
        }

        private void CheckBirthday()
        {
            var birthday = BirthdayControl.Tag?.ToString();
            DateTime dt;
            bool isDate = DateTime.TryParse(birthday, out dt);
            if (isDate)
                ShowAsSuccess(BirthdayControl);
            else
                ShowAsError(BirthdayControl);
        }

        private void ShowAsError(Control tb)
        {
            tb.Background = Brushes.IndianRed;
        }

        private void ShowAsSuccess(Control tb)
        {
            tb.Background = Brushes.LightGreen;
        }
    }
This code will work and there are some interesting things we can see here.
- When changing the background of our ContentControl, the background of the TextBox changes. The reason is that we set the Template of the control ourselves, and if we choose to ignore the Background completely, then we can. We actually used the Background for our TextBox only. And with TemplateBinding , when we changed the property in the code-behind, WPF knew to re-render the TextBox.
- We were able to get the input text by Binding Text property to Tag. I couldn’t use TemplateBinding in there because it binds only OneWay. Which means when Tag changes, Text is updated, but not vice-versa. For TwoWay we need to use the full Binding format
“{Binding Tag, RelativeSource={RelativeSource TemplatedParent}}”
I have to admit, this is not the prettiest code I ever wrote. I don’t like that we use Content, Tag and Background for things they weren’t intended for. But on the upside, we were able to write fully functional reusable UI component with very few lines of code.
I wrote the code this way because I think it’s both little code and shows a lot of WPF’s abilities when using ControlTemplate. But actually we could’ve written this code in many different ways. We could’ve created a custom control and add additional dependency properties like Caption, Text and ValidationBackground which would make the code more readable. Another thing we could do is in the code-behind we can find the TextBox with VisualTreeHelper instead of using Binding. Then we could change the TextBox’s background directly.
Anyway, I think what we did here can be nice for pure UI elements. As for more complex elements… Let’s just see our other options. For one thing, what about them User Controls?
Approach #2: User Controls
Let’s create a new user control called InputItemControl. When creating the user control, two files are created: InputItemControl.xaml and InputItemControl.xaml.cs
They both represent the same class. The .cs file is our code-behind. Very similar to WinForms .cs and designer.cs classes.
Now the main window should look something like this:
<Window x:Class="CustomCtrlOrUserOrDataTemplate.MainWindow"
  …>
    <Grid>
        <StackPanel Margin="3">
            <local:InputItemControl />
            <local:InputItemControl />
            <local:InputItemControl />
Only that these areas differ from each other, don’t they? Each has a distinct caption and distinct validation rules. We’ll need to somehow pass parameters to our user controls and relate to those parameters is the user control’s XAML. We want the ability to write something like this:
<local:InputItemControl Caption="Enter Your Name:" ValidationType="Name" />
WPF allows to ‘Pass parameters’ to user controls in different ways. The most common ways are:
- Regular properties in the code-behind with call to NotifyPropertyChange in the setter.
- Dependency properties.
- Give our user control a ViewModel and have all the parameters there.
Since we’re trying different ways, let’s try without MVVM first. A winformy sort of way. We can use dependency properties.
The main window will look like this:
<Window …>
    <Grid>
        <StackPanel>
            <local:InputItemControl
                Caption="Enter your name:" x:Name="NameControl"/>
            <local:InputItemControl
                Caption="Enter your zip code:" x:Name="ZipControl"/>
            <local:InputItemControl
                Caption="Enter your birthday:" x:Name="BirthdayControl"/>

            <Button Width="100" HorizontalAlignment="Left" Click="OnOKClick"
                Margin="3">OK</Button>
        </StackPanel>
    </Grid>
</Window>
With code behind:
public partial class MainWindow : Window
{
…
    private void OnOKClick(object sender, RoutedEventArgs e)
    {
        NameControl.CheckValid();
        ZipControl.CheckValid();
        BirthdayControl.CheckValid();
    }
}
The user control InputItemControl.xaml is:
<UserControl …
             DataContext="{Binding RelativeSource={RelativeSource Self}}">

    <Border Background="LightGray" >
        <DockPanel>
            <TextBlock DockPanel.Dock="Left" Text="{Binding Caption}"/>
            <TextBox Text="{Binding InputText}" x:Name="InputTextBox"/>
        </DockPanel>
    </Border>
</UserControl>
A bit about Binding:
When using {Binding XXX }, WPF looks for XXX in the DataContext of the current object. So when writing <TextBox Text=”{Binding InputText}”, WPF will go to the TextBox’s DataContext.InputText.
DataContext is inherited property. So when we defined DataContext for the UserCotnrol, all its children will get the same DataContext unless specified otherwise.
After adding dependency properties in the code behind of our user control it will looks like this:
public partial class InputItemControl : UserControl
{
    public InputItemControl()
    {
        InitializeComponent();
    }

    public string Caption
    {
        get { return (string)GetValue(CaptionProperty); }
        set { SetValue(CaptionProperty, value); }
    }
    public static readonly DependencyProperty CaptionProperty =
        DependencyProperty.Register("Caption", typeof(string), typeof(InputItemControl), new PropertyMetadata(null));

    public ValidationType ValidationType
    {
        get { return (ValidationType)GetValue(ValidationTypeProperty); }
        set { SetValue(ValidationTypeProperty, value); }
    }
    public static readonly DependencyProperty ValidationTypeProperty =
        DependencyProperty.Register("ValidationType", typeof(ValidationType), typeof(InputItemControl), new PropertyMetadata(ValidationType.Name));

    public string InputText
    {
        get { return (string)GetValue(InputTextProperty); }
        set { SetValue(InputTextProperty, value); }
    }
    public static readonly DependencyProperty InputTextProperty =
        DependencyProperty.Register("InputText", typeof(string), typeof(InputItemControl), new PropertyMetadata(""));

    public void CheckValid()
    {
        bool valid = ValidationTests.IsValid(InputText, ValidationType);
        if (valid)
            InputTextBox.Background = Brushes.LightGreen;
        else
            InputTextBox.Background = Brushes.IndianRed;
    }
}
I created a new class to handle our validation logic ValidationFieldLogic:
public enum ValidationType {Name, ZipCode, Date}

public static class ValidationFieldLogic
{
    public static bool IsValid(string input, ValidationType validationType)
    {
        switch (validationType)
        {
            case ValidationType.Name:
                return IsNameValid(input);
            case ValidationType.ZipCode:
                return IsZipValid(input);
            default:
            case ValidationType.Date:
                return IsDateValid(input);
        }
    }

    private static bool IsDateValid(string inputText)
    {
        DateTime dt;
        return DateTime.TryParse(inputText, out dt);
    }

    private static bool IsZipValid(string zip)
    {
        if (zip == null || zip.Length != 5)
            return false;
        int n;
        return int.TryParse(zip, out n);
    }

    private static bool IsNameValid(string name)
    {
        return name != null && name.Length >= 3;
    }
}
That’s it. We created a reusable user control that can show any caption with any validation type. We can now show it anywhere in the application with any parameters.
We did have to write more code than the initial ControlTemplate solution. Especially those annoying Dependency Properties. But consider what we’ve achieved. Our MainWindow looks very clean now. And we decoupled our main window, user control view and validation logic to different files. We can reuse the user control and validation logic anywhere in the application now.
A bit about WPF with MVVM:
Even though we used a lot of WPF features (Binding, DependencyProperties, User Controls) we didn’t use MVVM at all. WPF doesn’t force us to use any design pattern.
All we did right now is very similar to WinForms design style. We did use WPF’s cool Binding features, but we didn’t create any ViewModels, just Views. Let’s see how we can deal with our challenge with MVVM.
Approach #3 DataTemplates and MVVM
DataTemplates give a “template” for our “data”. Or in other words, give a “view” to our “view model”. So let’s create some view models.
First part: ViewModels
First, a “main” view model for the main window:
public class MainViewModel : BaseViewModel
{
    public MainViewModel()
    {
        _fields = new ObservableCollection<FieldViewModel>();
        _fields.Add(new FieldViewModel() { Caption = "Enter your name:",
InputText = "", ValidationType = ValidationType.Name });
        _fields.Add(new FieldViewModel() { Caption = "Enter your zip code:",
InputText = "", ValidationType = ValidationType.ZipCode });
        _fields.Add(new FieldViewModel() { Caption = "Enter your birthday:",
InputText = "", ValidationType = ValidationType.Date });
    }

    ObservableCollection<FieldViewModel> _fields;
    public ObservableCollection<FieldViewModel> Fields
    {
        get { return _fields; }
        set
        {
            _fields = value;
            OnPropertyChanged();
        }
    }

    ICommand _okCommand;
    public ICommand OkCommand
    {
        get
        {
            if (_okCommand == null)
                _okCommand = new DelegateCommand(OnOkClicked);
            return _okCommand;
        }
    }

    private void OnOkClicked()
    {
        foreach (var field in Fields)
        {
            field.CheckValidation();
        }
    }
}
Here we got our fields and our validation “Click” action.
BaseViewModel and DelegateCommand
BaseViewModel code can be found here and DelegateCommand code here . Those are pretty standard classes you should have in any WPF application.
The FieldViewModel looks like this:
public class FieldViewModel : BaseViewModel
{
    string _caption = "";
    public string Caption
    {
        get { return _caption; }
        set
        {
            _caption = value;
            OnPropertyChanged();
        }
    }

    string _inputText = "";
    public string InputText
    {
        get { return _inputText; }
        set
        {
            _inputText = value;
            OnPropertyChanged();
        }
    }

    ValidationType _validationType = ValidationType.Name;
    public ValidationType ValidationType
    {
        get { return _validationType; }
        set
        {
            _validationType = value;
            OnPropertyChanged();
        }
    }

    bool? _isValid = null;
    public bool? IsValid
    {
        get { return _isValid; }
        set
        {
            _isValid = value;
            OnPropertyChanged();
        }
    }

    public void CheckValidation()
    {
        IsValid = ValidationFieldLogic.IsValid(InputText, ValidationType);
    }
}
Second part: Views
Connecting the View to the ViewModel:
public MainWindow()
{
    InitializeComponent();
    _vm = new MainViewModel();
    this.DataContext = _vm;
}
Connecting the View to the ViewModel is a big deal for some WPF developers and that’s an entirely different post right there. Let’s just say for now that we don’t want to get religious about that, and that this simple approach in the example is just fine.
Our main window:
<Window …>
  <Window.Resources>
    <local:ValidColorConverter x:Key="ValidColorConverter"/>
  </Window.Resources>
    <StackPanel>
      <ItemsControl ItemsSource="{Binding Fields}">
        <ItemsControl.ItemTemplate>
          <DataTemplate>
            <Border Background="LightGray">
              <DockPanel>
                <TextBlock DockPanel.Dock="Left" Text="{Binding Caption}"/>
                <TextBox Text="{Binding InputText}"
 Background="{Binding IsValid, Converter={StaticResource ValidColorConverter}}"/>
              </DockPanel>
            </Border>
          </DataTemplate>
        </ItemsControl.ItemTemplate>
      </ItemsControl>
      <Button Command="{Binding OkCommand}">OK</Button>
    </StackPanel>
</Window>
ItemsControl
Using ItemsControl isn’t a must here at all. Instead, I could’ve wrote something like this:
<ContentPresenter ContentTemplate=”{StaticResource MyTemplate}” Content=”{Binding NameContent” />
<ContentPresenter ContentTemplate=”{StaticResource MyTemplate}” Content=”{Binding ZipContent” />
<ContentPresenter ContentTemplate=”{StaticResource MyTemplate}” Content=”{Binding BirthdayContent” />
Which means I’d need to have the DataTemplate as a Resource and instead of ObservableCollection, I’d need to have 3 properties: NameContent, ZipContent and BirthdayContent.
The converter is an additional file, but it should be part of the “View” project and not part of the “ViewModel” project.
public class ValidColorConverter : IValueConverter
{
    public object Convert(object value, Type targetType, object parameter, CultureInfo culture)
    {
        bool? val = value as bool?;
        if (val == null)
            return Brushes.White;
        else if (val.Value)
            return Brushes.LightGreen;
        else
            return Brushes.IndianRed;
    }

    public object ConvertBack(object value, Type targetType, object parameter, CultureInfo culture)
    {
        throw new NotImplementedException();
    }
}
Well this is it, the MVVM solution is ready!
Let’s inspect what we did here more closely.
- For one thing, I had to write more code. So in a way, MVVM design will require more work initially than WinForms type design.
- The ViewModel part is completely decoupled from the View part. The ViewModel objects are pure data objects and can be held in a different project file from your Views. This has several important implications:
- You can develop Views and ViewModels separately. Even by different teams. The Business Logic programmers will work with ViewModels and the UI programmers / designers will work on the XAML.
- You can have multiple Views for each ViewModel. This is important since you will might have to present the same data differently – Full screen, half screen, as a small expandable area, etc.
- Your ViewModels are easily testable! This is very important because UI elements are notoriously hard to test.
- Since ViewModels are pure data, they do not need to reference WPF elements at all. You can theoretically port the code to a different UI technology.
Approach #4 Integrating User Controls and MVVM
We can integrate UserControls easily here and still stay with the MVVM pattern.
Instead of writing the view in the DataTemplate itself, we can write the view in a user control. So the ItemTemplate changes to
<ItemsControl.ItemTemplate>
    <DataTemplate>
      <local:InputItemControl />
    </DataTemplate>
</ItemsControl.ItemTemplate>
The DataContext of our user control will automatically become FieldViewModel. This means that in the XAML of the user control we can use {Binding Caption} and it will work as well as in the DataTemplate. Our user conrtol’s XAML will be:
<UserControl …>
    <Border Background="LightGray" >
          <DockPanel>
                <TextBlock DockPanel.Dock="Left" Text="{Binding Caption}"/>
                <TextBox Text="{Binding InputText}"
 Background="{Binding IsValid, Converter={StaticResource ValidColorConverter}}"/>
          </DockPanel>
    </Border>
</UserControl>
This is the same as inside the DataTemplate in the previous example.
The user control’s code-behind should be empty.
Comparison between the approaches
We saw four ways to reuse a component in WPF.
- Save the view in a ControlTemplate as a resource.
- Use User Control with dependency properties. (WinForms design style)
- Have a collection of ViewModels and use DataTemplate to show them with the same View. (MVVM)
- Have a collection of ViewModels and use DataTemplate to show a user controls and connect the user control’s DataContext to the ViewModel. (MVVM)
Approach #1, which is using ControlTemplate as a resource, I recommend using only when your View doesn’t have functionality. It’s great for saving Icons for example. However, once you have the sort of functionality we have here, it’s best to use one of the other approaches.
I think approach #3 and #4 is pretty much the same. When your file gets long and you want to split it to several files, you can move the view to a user control. Or if you want to reuse the same view in another XAML file, also move the code to a user control.
So which is better? Approach #2 or the MVVM approaches #3 and**#4**?
Truth be told I think approach #2 was easier to write and understand. I also had to type less. It’s the WinForms way of doing things. Do you remember WinForms? WinForms had a lot of problems, but it was very productive to work with WinForms! Especially in small or medium applications. And with WPF we get those cool binding features WinForms didn’t have.
I try to never get religious about things and taking them to the extreme. What I mean is that there’s almost never a solution that’s true for everybody. Having said that, I think going MVVM is better almost always. Here’s why:
Pros of MVVM
- ViewModels, as your views get more complex, are way easier to work with than code-behind code. You just have to keep the data in your properties correct and call OnPropertyChange() on time. The alternative, changing the view itself from EventHandlers can get buggy very quickly. Especially when one control affects other controls, which in turn affects the original control and others more.
- MVVM is the WPF convention of doing things. So when you design an MVVM application, any WPF developer can understand your code and integrate into the team easily.
- Having a dedicated team of designers working with XAML can be a great advantage! Designers create better UI than programmers. They are also usually cheaper. That means the organization will have more money for your Christmas bonus!
- Your ViewModels are testable. This is not exactly testable UI, but it’s close.
When your logic is in the code-behind it’s extremely hard to test. Imagine that you have to write new MyUserControl() in your test code. This calls InitializeComponent() which creates all the UI elements in the visual tree. Only that you are in the test context. The user control has no parent and there isn’t an actual visual tree. You can’t actually Load the component. So any changes to UI elements will either do nothing or cause an exception…
Should we ever use User controls with code-behind logic instead of View Models?
I think it’s OK to use WinForms design style in these cases:
- When creating small applications. Like in-house tools.
- When you’re working on the code by yourself. And you worry about job security 😉
- When trying to crack a specific problem in your big application and you create a small side project to tackle just that.
- When porting your code from WinForms to WPF, you will end up with WinForms type design initially. There’s not always time to redesign to MVVM. And frankly, there isn’t always need. If it’s a view you don’t change very often and it works, there are probably more important things you can do with your time.
Conclusion
We saw a lot of ways we can reuse UI components. WPF is very flexible and you can do the same thing in different ways. With time, you get to feel which way is “right” and which is “wrong”.
Also, it’s hard to go wrong when choosing MVVM way of doing things. I hope that I showed that MVVM is pretty easy to write and that it gives you a good, decoupled design that is a great choice for your application. Even if it means typing just a bit more code.
Hope you learned something and have a great day 🙂


