
Find, Fix, and Avoid Memory Leaks in C# .NET: 8 Best Practices

Anyone who worked on a big enterprise project knows memory leaks are like rats in a big hotel. You might not notice when there are few of them, but you always have to be on guard in case they overpopulate, break into the kitchen, and poop on everything.
Finding, Fixing and learning to Avoid Memory Leaks is an important skill. I’ll list 8 best practice techniques used by me and senior .NET developers that advised me for this article. These techniques will teach you to detect when there’s a memory leak problem in the application, to find the specific memory leak and to fix it. Finally, I’ll include strategies to monitor and report on memory leaks for a deployed program.
Defining Memory Leaks in .NET
In a garbage collected environment, the term memory leaks is a bit
There are 2 related core causes for this. The first core cause is when you have objects that are still referenced but are effectually unused. Since they are referenced, the garbage collector won’t collect them and they will remain forever, taking up memory. This can happen, for example, when you register to events but never unregister.
The second cause is when you somehow allocate unmanaged memory (without garbage collection) and don’t free it. This is not so hard to do. .NET itself has a lot of classes that allocate unmanaged memory. Almost anything that involves streams, graphics, the file system or network calls does that under the hood. Usually, these classes implement a Dispose method, which frees the memory (we’ll talk about that later). You can easily allocate unmanaged memory yourself with special .NET classes (like Marshal) or PInvoke (there’s an example of this further on).
Let’s move on to my best practice techniques list:
1. Detect a Memory Leak problem with the Diagnostic Tool Window
If you go to Debug | Windows | Show Diagnostic Tools, you’ll see this window. If you’re like me, you probably saw this tool window after installing Visual Studio, closed it immediately, and never thought of it again. The Diagnostic Tools Window can be quite useful though. It can easily help you detect 2 problems: Memory Leaks and GC Pressure.
When you have Memory Leaks, the Process Memory graph looks like this:

You can see with the yellow lines coming from the top that the GC is trying to free memory, but it still keeps rising.
When you have GC Pressure, the Process Memory graph looks like this:

GC Pressure is when you are creating new objects and disposing of them too quickly for the garbage collector to keep up. As you see in the picture, the memory is close to its limit and the GC bursts are very frequent.
You won’t be able to find specific memory leaks this way, but you can detect that you have a memory leak problem, which is useful by itself. In Enterprise Visual Studio, the Diagnostics Window also includes a built-in memory profiler, which does allow to find the specific leak. We’ll talk about memory profiling in best practice #3.
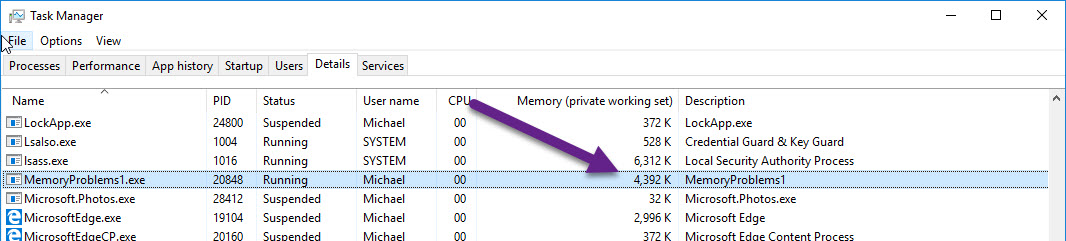
2. Detect Memory Leak problems with the Task Manager, Process Explorer or PerfMon
The second easiest way to detect major memory leak problems is with the Task Manager or Process Explorer (from SysInternals). These tools can show the amount of memory your process uses. If it consistently increases over time, you probably have a memory leak.
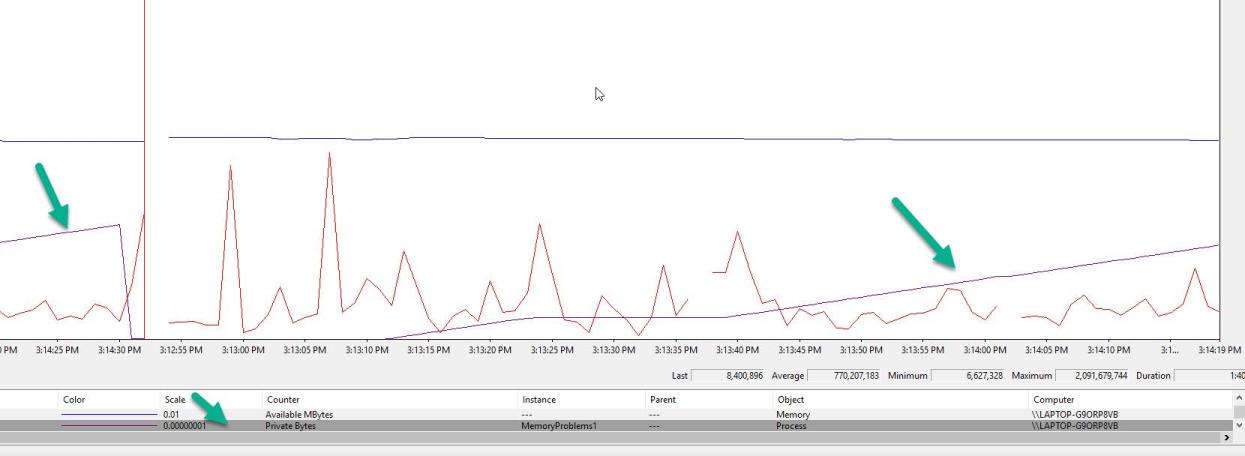
PerfMon is a bit harder to use but can show a nice graph of your memory usage over time. Here’s a graph of my application that endlessly allocates memory without freeing it. I’m using the Process | Private Bytes counter.
Note that this method is notoriously unreliable. You might have an increase in memory usage just because the GC didn’t collect it yet. There’s also the matter of shared memory and private memory, so you can both miss memory leaks and/or diagnose memory leaks that aren’t your own (explanation ). Finally, you might mistake memory leaks for GC Pressure. In this case, you don’t have a memory leak but you create and dispose of objects so fast that the GC doesn’t keep up.
Despite the disadvantages, I mention this technique because it’s both easy to use and sometimes your only tool. It’s also a decent indicator something is wrong when observing for a very long period of time.
3. Use a memory profiler to detect memory leaks
A memory profiler is like the Chef’s Knife of handling memory leaks. It’s the main tool to find and fix them. While other techniques can be easier to use or cheaper (profiler licenses are costly), it’s best to be proficient by with at least one memory profiler to effectively solve memory leak problems.
The big names in .NET memory profilers
All memory profilers work in a similar way. You can either attach to a running process or open a Dump file . The profiler will create a Snapshot of your process’ current memory heap. You can analyze the snapshot in all kinds of ways For example, here’s a list of all the allocated objects in the current snapshot:

You can see how many instances of each type are allocated, how much memory they take, and the reference path to a GC Root.
A GC Root is an object which the GC can’t free, so anything that the GC root references also can’t be freed. Static objects and the local objects in the current active Threads are GC Roots. Read more in Understanding Garbage Collection in .NET .
The quickest and most useful profiling technique is to compare 2 snapshots where the memory should return to the same state. The first snapshot is taken before an operation, and another snapshot is taken after the operation. The exact steps are:
- Start with some kind of Idle state in your application. This could be the Main Menu or something similar.
- Take a snapshot with the Memory profiler by attaching-to-process or saving a Dump .
- Run an operation where you suspect a memory leak is created. Return to the Idle state at the end of it.
- Take a second snapshot.
- Compare both snapshots with your memory profiler.
- Investigate the New-Created-Instances, they are probably memory leaks. Examine the “path to GC Root” and try to understand why those objects weren’t freed.
Here’s a great video where 2 snapshots are compared in SciTech memory profiler and the memory leak is found:
4. Use “Make Object ID” to find memory leaks
In my last article 5 Techniques to avoid Memory Leaks by Events in C# .NET you should know I showed a technique to find a memory leak by placing a breakpoint in the class Finalizer. I’ll show you a similar method here that’s even easier to use and doesn’t require code changes. This one utilizes the Debugger’s Make Object ID feature and the Immediate Window.
Suppose you suspect a certain class has a memory leak. In other words, you suspect that after running a certain scenario, this class stays referenced and never collected by the GC. To find out if the GC actually collected it, follow these steps:
- Place a breakpoint where the instance of the class is created.
- Hover over the variable to open the debugger’s data-tip, then right-click and use Make Object ID. You can type in the Immediate Window $1 to see that the Object ID was created correctly.
- Finish the scenario that was supposed to free your instance from references.
- Force GC collection with the known magic lines
GC.Collect();
GC.WaitForPendingFinalizers();
GC.Collect();
- Type $1 again in the immediate window. If it returns null, then the GC collected your object. If not, you have a memory leak.
Here’s me debugging a scenario that has a memory leak:
Important: This practice doesn’t work well in .NET Core 2.X debugger (issue ). Forcing garbage collection in the same scope as the object allocation doesn’t free that object. You can do it with a little more effort by forcing garbage collection in another method out of scope.
5. Beware of common memory leak sources
There’s always a risk of causing a memory leak, but there are certain patterns that are much more likely to do so. I suggest to be extra careful when using these, and proactively check for memory leaks with techniques like the last best practice.
Here are some of the more common offenders:
Events in .NET are notorious for causing memory leaks. You can innocently subscribe to an event, causing a damaging memory leak without even suspecting. This subject is so important that I dedicated an entire article to it: 5 Techniques to avoid Memory Leaks by Events in C# .NET you should know
Static variables, collections, and static events in-particular should always look suspicious. Remember that all static variables are GC Roots, so they are never collected by the GC.
Caching functionality – Any type of caching mechanism can easily cause memory leaks. By storing cache information in-memory, eventually, it will fill up and cause an OutOfMemory exception. The solution can be to periodically delete older caching or limit your caching amount.
WPF Bindings can be dangerous. The rule of thumb is to always bind to a DependencyObject or to
a **INotifyPropertyChanged object. When you fail to do so, WPF will create a strong reference to your binding source (meaning the ViewModel) from a static variable, causing a memory leak. More information on WPF Binding leaks in this helpful StackOverflow threadCaptured members – It might be clear that an Event Handler Method means an object is referenced, but when a variable is Captured in an anonymous method, then it’s also referenced. Here’s an example of a memory leak:
public class MyClass
{
    private int _wiFiChangesCounter = 0;

    public MyClass(WiFiManager wiFiManager)
    {
        wiFiManager.WiFiSignalChanged += (s, e) => _wiFiChangesCounter++;
    }
- Threads that never terminate – The Live Stack of each of your threads is considered a GC Root. This means that until a thread terminates, any references from its variables on the Stack will not be collected by the GC. This includes Timers as well. If your Timer’s Tick Handler is a method, then the method’s object is considered referenced and will not be collected. Here’s an example of a memory leak:
public class MyClass
{
    public MyClass(WiFiManager wiFiManager)
    {
        Timer timer = new Timer(HandleTick);
        timer.Change(TimeSpan.FromSeconds(5), TimeSpan.FromSeconds(5));
    }

    private void HandleTick(object state)
    {
        // do something
    }
For more on this subject, check out my article 8 Ways You can Cause Memory Leaks in .NET .
6. Use the Dispose pattern to prevent unmanaged memory leaks
Your .NET application constantly uses unmanaged resources. The .NET framework itself relies heavily on unmanaged code for internal operations, optimization, and Win32 API. Anytime you use Streams, Graphics, or Files
.NET framework classes that use unmanaged code usually implement IDisposable. That’s because unmanaged resources need to be
public void Foo()
{
    using (var stream = new FileStream(@"C:\Temp\SomeFile.txt",
                                       FileMode.OpenOrCreate))
    {
        // do stuff

    }// stream.Dispose() will be called even if an exception occurs
The using statement transforms the code into a try / finally statement behind the scenes, where the Dispose method is called in the
But, even if you don’t call the Dispose method, those resources will be freed because .NET classes use the Dispose Pattern . This basically means that if Dispose wasn’t called before, it’s called from the Finalizer when the object is garbage collected. That is, if you don’t have a memory leak and the Finalizer really is called.
When you’re allocating unmanaged resources yourself, then you definitely should use the Dispose pattern. Here’s an example:
public class MyClass : IDisposable
{
    private IntPtr _bufferPtr;
    public int BUFFER_SIZE = 1024 * 1024; // 1 MB
    private bool _disposed = false;

    public MyClass()
    {
        _bufferPtr =  Marshal.AllocHGlobal(BUFFER_SIZE);
    }

    protected virtual void Dispose(bool disposing)
    {
        if (_disposed)
            return;

        if (disposing)
        {
            // Free any other managed objects here.
        }

        // Free any unmanaged objects here.
        Marshal.FreeHGlobal(_bufferPtr);
        _disposed = true;
    }

    public void Dispose()
    {
        Dispose(true);
        GC.SuppressFinalize(this);
    }

    ~MyClass()
    {
        Dispose(false);
    }
}
The point of this pattern is to allow explicit disposal of resources. But also to add a safeguard that your resources will be disposed during garbage collection (in the Finalizer) if the Dispose() wasn’t called.
The GC.SuppressFinalize(this) is also important. It makes sure the Finalizer isn’t called on garbage collection if the object was already
7. Add Memory Telemetry from Code
Sometimes, you might want to periodically log your memory usage. Maybe you suspect your production Server has a memory leak. Perhaps you want to take some action when your memory reaches a certain limit. Or maybe you’re just in the good habit of monitoring your memory.
There’s a lot of information we can get from the app itself. Getting current memory in-use is as simple as:
Process currentProc = Process.GetCurrentProcess();
var bytesInUse = currentProc.PrivateMemorySize64;
For more information, you can use the PerformanceCounter class that’s used for PerfMon:
PerformanceCounter ctr1 = new PerformanceCounter("Process", "Private Bytes", Process.GetCurrentProcess().ProcessName);
PerformanceCounter ctr2 = new PerformanceCounter(".NET CLR Memory", "# Gen 0 Collections", Process.GetCurrentProcess().ProcessName);
PerformanceCounter ctr3 = new PerformanceCounter(".NET CLR Memory", "# Gen 1 Collections", Process.GetCurrentProcess().ProcessName);
PerformanceCounter ctr4 = new PerformanceCounter(".NET CLR Memory", "# Gen 2 Collections", Process.GetCurrentProcess().ProcessName);
PerformanceCounter ctr5 = new PerformanceCounter(".NET CLR Memory", "Gen 0 heap size", Process.GetCurrentProcess().ProcessName);
//...
Debug.WriteLine("ctr1 = " + ctr1 .NextValue());
Debug.WriteLine("ctr2 = " + ctr2 .NextValue());
Debug.WriteLine("ctr3 = " + ctr3 .NextValue());
Debug.WriteLine("ctr4 = " + ctr4 .NextValue());
Debug.WriteLine("ctr5 = " + ctr5 .NextValue());
Information from any perfMon counter is available, which is plenty.
You can go even deeper though. CLR MD (Microsoft.Diagnostics.Runtime) allows you to inspect your current memory heap and get any possible information. For example, you can print all the allocated types in memory, including instance counts, paths to roots and so on. You pretty much got a memory profiler from code.
To get a whiff of what you can achieve with CLR MD, check out Dudi Keleti’s DumpMiner .
All this information can be logged to a file, or even better, to a telemetry tool like Application Insights.
8. Test for memory leaks
It’s a great practice to proactively test for memory leaks. And it’s not that hard. Here’s a short pattern you can use:
[Test]
void MemoryLeakTest()
{
  var weakRef = new WeakReference(leakyObject)
  // Ryn an operation with leakyObject
  GC.Collect();
  GC.WaitForPendingFinalizers();
  GC.Collect();
  Assert.IsFalse(weakRef.IsAlive);
}
For more in-depth testing, memory profilers like SciTech’s .NET Memory Profiler and dotMemory provide a testing API:
MemAssertion.NoInstances(typeof(MyLeakyClass));
MemAssertion.NoNewInstances(typeof(MyLeakyClass), lastSnapshot);
MemAssertion.MaxNewInstances(typeof(Bitmap), 10);
Summary
Don’t know about you, but my new year’s resolution is: Better memory management.
I hope this post gave you some value and I’d love it if you subscribe to my blog or leave a comment below. Any feedback is welcome.


