
WPF complete guide to Themes and Skins

In WPF we define a UI resource system (mostly in XAML resource dictionaries) which includes colors, templates, icons, styles and so on. Sometimes, we need the ability to change our application’s look and feel dynamically, allowing different Themes or Skins.
We might have Shared resources for all Themes and Dynamic resources based on the current Theme or Skin.
The following article talks about the different ways to build a theming/skinning infrastructure in a WPF application.
Theming and Skinning terms
The terms Theming and Skinning mean something very specific in WPF. Theming refers to a Windows theme like Aero or Luna. In each Windows version (XP, Vista, Win 7) there’s a different default Theme where controls like a Button or a Progress Bar look different. You might want to change your own controls according to the current Windows Theme. Or, force a specific Theme for your application.
Skinning refers to changing your application’s looks and feel according to a user setting or some custom logic. For example, use different colors according to the current customer.
Theming
WPF has a built-in system to support Themes:
- Forcing WPF to use a specific Theme
- WPF to load automatically a different Resource Dictionary according to active Windows theme.
This explains that giving a specific name to a Resource dictionary file, for example, Luna.NormalColor.xaml, it will load automatically when the current Theme is Luna.
The rest of the article is about Skinning since I think it’s a more common scenario and the solutions are similar to the ones for Theming.
When do we need Skinning
There are two common scenarios when we need skinning.
- If we are building a B2B application, our customers might want different branding for the application. So if we’re building a cashier app for McDonald’s, they might want the colors to be the McDonald’s Yellow and Red.
- For a consumer app, we might want to give our users a choice for a custom look and feel. This might be different colors, different control styles and so on.
Skin loading: Compiled, Loose, Static or Dynamic
There are different kinds of ways to load the skin:
- Compiled and Static – Compiled means the XAML resources are included with your assembly. By Static I mean that the Skin can’t change during runtime. A restart of the App will be required. This is true for our B2B scenario. McDonald’s will never want to change their Skin to Burger King for example.
- Compiled and Dynamic – By Dynamic I mean the Skin can be changed at runtime. However, since it’s Compiled, we can’t “Import” custom Skins from outside of our assembly.
- Loose – Loose refers to Loose XAML, where we can load XAML resources from any XAML file. For example, if you remember WinAmp , it had a pretty cool Skin system, where you could download skins from the internet.
Which to choose?
The easiest to implement is Compiled and Static. If changing Skin at runtime is required, then we’ll use Compiled and Dynamic. Using any Loose XAML should be our last resort since it’s error-prone, has some limitation, and with the worst performance.
Compiled and Static Skinning
We got several ways to achieve Compiled and Static Skinning. Each has pros and cons.
- Use SkinResourceDictionary class. (Also supports Dynamic Skinning with some changes)
- Add the merged dictionaries in code (Also supports Dynamic Skinning)
- Single resource dictionary per Skin, parsed and added directly to App.xaml (Also supports Dynamic Skinning)
Using SkinResourceDictionary class
This is a really simple way to implement Skinning and use whatever XAML resource hierarchy we want. (See possible problems with WPF XAML hierarchy).
SkinResourceDictionary is like a regular ResourceDictionary, except that we give a different Source for each Skin. Here’s the code:
First, we need to add the SkinResourceDictionary class:
public class SkinResourceDictionary : ResourceDictionary
    {
        private Uri _redSource;
        private Uri _blueSource;

        public Uri RedSource
        {
            get { return _redSource; }
            set {
                _redSource = value;
                UpdateSource();
            }
        }
        public Uri BlueSource
        {
            get { return _blueSource; }
            set {
                _blueSource = value;
                UpdateSource();
            }
        }

        private void UpdateSource()
        {
            var val = App.Skin == Skin.Red ? RedSource : BlueSource;
            if (val != null && base.Source != val)
                base.Source = val;
        }
    }
App.Skin is just a static property in App.xaml.cs.
public enum Skin { Red, Blue }

public partial class App : Application
{
    public static Skin Skin { get; set; } = Skin.Blue;
The property’s initial value defines the App’s Skin.
Then, we use SkinResourceDictionary just as we would a normal Resource Dictionary. In App.xaml:
<Application ...>
    <Application.Resources>
        <ResourceDictionary>
            <ResourceDictionary.MergedDictionaries>
                <local:SkinResourceDictionary RedSource="RedColors.xaml"
                                              BlueSource="BlueColors.xaml" />
                <local:SkinResourceDictionary RedSource="RedSizes.xaml"
                                              BlueSource="BlueSizes.xaml" />
                <ResourceDictionary Source="MyBorderStyle.xaml"/>
            </ResourceDictionary.MergedDictionaries>
        </ResourceDictionary>
    </Application.Resources>
</Application>
RedColors.xaml:
<ResourceDictionary ...>
    <SolidColorBrush x:Key="NormalBackground" Color="Red"/>
BlueColors.xaml:
<ResourceDictionary ...>
    <SolidColorBrush x:Key="NormalBackground" Color="Blue"/>
RedSizes.xaml:
<ResourceDictionary ..>
    <CornerRadius x:Key="NormalCornerRadius">10</CornerRadius>
BlueSizes.xaml:
<ResourceDictionary ..>
    <CornerRadius x:Key="NormalCornerRadius">0</CornerRadius>
MyBorderStyle.xaml:
<ResourceDictionary ...>
    <Style TargetType="Border" x:Key="MyBorderStyle">
        <Setter Property="Background" Value="{StaticResource NormalBackground}"/>
        <Setter Property="CornerRadius" Value="{StaticResource NormalCornerRadius}"/>
    </Style>
</ResourceDictionary>
NiceSquare.xaml:
<UserControl ...>
        <Border Width="100" Height="100" Style="{StaticResource MyBorderStyle}"/>
</UserControl>
MainWindow.xaml:
<Window ... >
        <local:NiceSquare/>
</Window>
This is it, a simple implementation of Skins.
I really like this approach when all we need is to load a compiled Skin on startup. It’s easy to use and the Designer works with different skins.
With some change, we can use this SkinResourceDictionary approach with dynamic skinning as well. Besides, I want to show you two other methods to achieve skinning, which works both Statically and Dynamically. So let’s move right on to Dynamic Skinning.
Compiled and Dynamic Skinning
As mentioned, we might want to change our Skin at runtime.
An example would be a user going to “Settings -> Skins”, changing to “Dark” and the entire Application UI will change appearance and colors to the Dark Skin.
A problem with dynamic skin changing is that when changing all our resources to the new “Dark” resources, the resources change will not be applied immediately. The Controls need to be reloaded. That is assuming we are using StaticResource. If using DynamicResource, the Controls will be updated to the new looks immediately. However, using DynamicResource presents some major problems .
Let’s see three approaches to achieve this:
- Use SkinResourceDictionary and call UpdateSource() on Skin change
- Add merged dictionaries in code
- Single resource dictionary per Skin
1 -SkinResourceDictionary and call UpdateSource() on Skin change
This is pretty similar to the previous example with SkinResourceDictionary. Since we need to change our Skin at runtime, we need to change the Source in the SkinResourceDictionary dynamically.
We’ll need to add a new method called ChangeSkin() in App.xaml.cs, which we would call whenever a skin change is needed.
It goes over all our merged dictionaries and causes them to reload. This is necessary even for regular resource dictionaries (not SkinResourceDictionary) because they might use StaticResource defined in a SkinResourceDictionary before it, and we want it to change according to the new Skin.
public partial class App : Application
{
    public static Skin Skin { get; set; } = Skin.Blue;

    public void ChangeSkin(Skin newSkin)
    {
        Skin = newSkin;

        foreach (ResourceDictionary dict in Resources.MergedDictionaries)
        {

            if (dict is SkinResourceDictionary skinDict)
                skinDict.UpdateSource();
            else
                dict.Source = dict.Source;
        }
    }
}
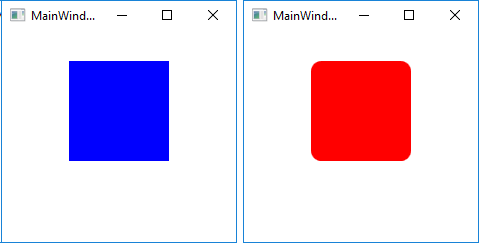
This is it. It’s the only change needed to make Dynamic Skinning work with SkinResourceDictionary. Here’s a basic example of usage:
In MainWindow.xaml:
<Window ...>
    <StackPanel x:Name="MyStackPanel">
        <Border x:Name="NiceSquareContainer" Margin="30">
            <local:NiceSquare/>
        </Border>
        <Button Content="Blue Skin" Background="Blue" Click="OnBlueClick"/>
        <Button Content="Red Skin" Background="Red" Click="OnRedClick"/>
    </StackPanel>
</Window>
MainWindow.xaml.cs:
public partial class MainWindow : Window
{
    public MainWindow()
    {
        InitializeComponent();
    }

    private void OnBlueClick(object sender, RoutedEventArgs e)
    {
        (App.Current as App).ChangeSkin(Skin.Blue);
        RefreshNiceSquare();
    }

    private void OnRedClick(object sender, RoutedEventArgs e)
    {
        (App.Current as App).ChangeSkin(Skin.Red);
        RefreshNiceSquare();
    }

    private void RefreshNiceSquare()
    {
        NiceSquareContainer.Child = new NiceSquare();
    }
}
And the result is:
RefreshNiceSquare() is necessary since we used StaticResource. If the control isn’t reloaded, the new Resources won’t apply.
There’s one thing that doesn’t work well here, and that is: Resources defined in App.xaml (not in a merged dictionary) will not change according to the new Skin. So if you use a Style for example that has StaticResource inside dependent on a Theme, it will not be updated on skin change. However, if that style is in a ResourceDictionary in another file and referenced in App.xaml’s MergedDictionaries, everything works fine. So just by moving all styles from the root of App.xaml to a dedicated resource dictionary and placing it last, everything will work. In other words, use App.xaml just for merged dictionaries.
2 – Add merged dictionaries in code
Instead of adding our resource dictionaries in XAML, we can add them and change them in code.
Let’s do that. In App.xaml.cs:
public enum Skin { Red, Blue }

public partial class App : Application
{
    public static Skin Skin { get; set; } = Skin.Blue;

    protected override void OnStartup(StartupEventArgs e)
    {
        base.OnStartup(e);
        ChangeSkin(Skin.Blue);
    }

    public void ChangeSkin(Skin newSkin)
    {
        Skin = newSkin;
        Resources.Clear();
        Resources.MergedDictionaries.Clear();
        if (Skin == Skin.Blue)
            ApplyBlueSkin();
        else if (Skin == Skin.Red)
            ApplyRedSkin();
        ApplySharedResources();
    }

    private void ApplyBlueSkin()
    {
        AddResourceDictionary("BlueColors.xaml");
        AddResourceDictionary("BlueSizes.xaml");
    }

    private void ApplyRedSkin()
    {
        AddResourceDictionary("RedColors.xaml");
        AddResourceDictionary("RedSizes.xaml");
    }
    private void ApplySharedResources()
    {
        AddResourceDictionary("MyBorderStyle.xaml");
    }

    private void AddResourceDictionary(string src)
    {
        Resources.MergedDictionaries.Add(new ResourceDictionary() { Source = new Uri(src, UriKind.Relative) });
    }
}
App.xaml should be empty now:
<Application ...>
    <Application.Resources>
        <ResourceDictionary>
        </ResourceDictionary>
    </Application.Resources>
</Application>
This is it. We basically hold all our resource dictionaries in the code and replace them when skin change is needed. Simple to implement and simple to understand.
Some issues with this are:
- We have to declare our merged dictionaries in code instead of in XAML as God intended.
- The designer doesn’t work when using this approach. To make the designer work, we can add our merged dictionaries with the default Skin to App.xaml, creating a duplication. However, if at some point, someone might add a resource dictionary in code but forgets to add it in XAML, the designer will fail or start lying.
- Like in the previous approach, if adding resources in App.xaml itself, they will not be updated on Skin change.
3 – Each Skin with a single resource dictionary
The idea is for each Skin to have a single Resource dictionary. So if you want the Blue Skin to be contained of BlueColors.xaml, BlueSizes,xaml and BlueStyles.xaml, then they will all be in a resource dictionary called BlueSkin.xaml. Like this:
BlueSkin.xaml:
<ResourceDictionary ...>
    <ResourceDictionary.MergedDictionaries>
        <ResourceDictionary Source="BlueColors.xaml"/>
        <ResourceDictionary Source="BlueSizes.xaml"/>
        <ResourceDictionary Source="BlueStyles.xaml"/>
    </ResourceDictionary.MergedDictionaries>
</ResourceDictionary>
The problem here is we can’t just merge BlueSkin.xaml in App.xaml because of a problem with WPF’s resource lookup order. If BlueStyles.xaml depends on a StaticResource in BlueColors.xaml, it will not work. It will work however if BlueColors.xaml and BlueStyles.xaml were merged directly in App.xaml (without BlueSkin.xaml). More about this problem here .
Another thing we might want to have is Shared resources, for all skins. These might depend on Theme resources and should be updated on Skin change.
Let’s see an example:
RedSkin.xaml:
<ResourceDictionary ...>
    <ResourceDictionary.MergedDictionaries>
        <ResourceDictionary Source="RedColors.xaml"/>
        <ResourceDictionary Source="RedSizes.xaml"/>
    </ResourceDictionary.MergedDictionaries>
</ResourceDictionary>
BlueSkin.xaml:
<ResourceDictionary ...>
    <ResourceDictionary.MergedDictionaries>
        <ResourceDictionary Source="BlueColors.xaml"/>
        <ResourceDictionary Source="BlueSizes.xaml"/>
    </ResourceDictionary.MergedDictionaries>
</ResourceDictionary>
Shared.xaml:
<ResourceDictionary ...>
    <ResourceDictionary.MergedDictionaries>
        <ResourceDictionary Source="MyBorderStyle.xaml"/>
    </ResourceDictionary.MergedDictionaries>
</ResourceDictionary>
To make all this work, here’s our App.xaml.cs:
public enum Skin { Red, Blue }

public partial class App : Application
{
    public static Skin Skin { get; set; }

    protected override void OnStartup(StartupEventArgs e)
    {
        base.OnStartup(e);
        ChangeSkin(Skin.Blue);
    }

    public void ChangeSkin(Skin newSkin)
    {
        Skin = newSkin;
        Resources.Clear();
        Resources.MergedDictionaries.Clear();
        if (Skin == Skin.Blue)
            ApplyResources("BlueSkin.xaml");
        else if (Skin == Skin.Red)
            ApplyResources("RedSkin.xaml");
        ApplyResources("Shared.xaml");
    }

    private void ApplyResources(string src)
    {
        var dict = new ResourceDictionary() { Source = new Uri(src, UriKind.Relative) };
        foreach (var mergeDict in dict.MergedDictionaries)
        {
            Resources.MergedDictionaries.Add(mergeDict);
        }

        foreach (var key in dict.Keys)
        {
            Resources[key] = dict[key];
        }
    }
}
And this is it.
App.xaml should be empty.With this approach, the designer doesn’t work. What we can do, is copy the content of some Skin and the content of Shared.xaml to App.xaml, sort of manually merging them. This should get the designer working. Just don’t commit to source control, or developers will start relying on it and the designer will start lying with time.
Summary so far
We saw several approaches to make a Skinning framework for our WPF App. All of them rely on the Skin to be compiled. Meaning the XAML file is included in the solution.
Out of all the approaches shown, I prefer and recommend the SkinResourceDictionary. It seems the cleanest one and also the only one with the Designer working out of the box. The SkinResourceDictionary will also work if you want to use a different resource dictionary for a UserControl’s merged dictionaries (Unlike all the examples we saw with application scope resources in App.xaml)
The last approach, with a single resource dictionary for a Skin, is also good in my opinion.
Now let’s see how we can load a custom resource dictionary XAML file from anywhere into our App.
Loose XAML Skinning
WPF gives us an ability to load and parse any XAML file with the XamlReader class. So we can parse and create a ResourceDictionary instance from any file on the hard drive, like this:
StreamReader streamReader = new StreamReader(src);
ResourceDictionary dict =
    XamlReader.Load(streamReader.BaseStream) as ResourceDictionary;
Since it’s not compiled, it’s both slow and error sensitive. By error sensitive, I mean that if the XAML file is not valid, an exception will be thrown.
Another thing I wasn’t able to do is to use a MergedDictionary inside the loose XAML file. This is pretty reasonable since WPF tries to look for the merged resource dictionary in the Assembly. A possible solution will be to manually parse the XAML file, find all the resource dictionaries and use XamlReader to load them. Or we can just avoid using MergedDictionaries and place all our resources in a single file.
As an example, I created this GreenSkin.xaml and placed it in C:\Skins\GreenSkin.xaml
<ResourceDictionary ...>
    <SolidColorBrush x:Key="NormalBackground" Color="Green"/>
    <CornerRadius x:Key="NormalCornerRadius">20</CornerRadius>
</ResourceDictionary>
Now, let’s continue from code of solution #3 – Each Skin with a single resource dictionary, and add a Green Skin. App.xaml.cs will be:
public enum Skin { Red, Blue, Green }

public partial class App : Application
{
    public static Skin Skin { get; set; }

    protected override void OnStartup(StartupEventArgs e)
    {
        base.OnStartup(e);
        ChangeSkin(Skin.Blue);
    }

    public void ChangeSkin(Skin newTheme)
    {
        Skin = newTheme;
        Resources.Clear();
        Resources.MergedDictionaries.Clear();
        if (Skin == Skin.Blue)
            ApplyResources("BlueSkin.xaml");
        else if (Skin == Skin.Red)
            ApplyResources("RedSkin.xaml");
        else if (Skin == Skin.Green)
            ApplyLooseResourceDictionary(@"C:\Skins\GreenSkin.xaml");

        ApplyResources("Shared.xaml");
    }

    private void ApplyLooseResourceDictionary(string src)
    {
        StreamReader streamReader = new StreamReader(src);
        ResourceDictionary dict = XamlReader.Load(streamReader.BaseStream)
                                  as ResourceDictionary;
        Resources.MergedDictionaries.Add(dict);
    }

    private void ApplyResources(string src)
    {
        var dict = new ResourceDictionary() { Source = new Uri(src, UriKind.Relative) };

        foreach (var mergeDict in dict.MergedDictionaries)
        {
            Resources.MergedDictionaries.Add(mergeDict);
        }

        foreach (var key in dict.Keys)
        {
            Resources[key] = dict[key];
        }
    }
This is it, loose skinning achieved.
I found a very interesting article by Tomer Shamam about Skinning and Loose Skins in particular. He created a Skin engine that does some optimization with Skin loading. He solves a problem that once you load Skin resources into current AppDomain, it cannot be unloaded and will stay in memory until the application is restarted.
Summary
We saw several approaches to support different Skins in a WPF app.
- The SkinResourceDictionary class.
- Add merged dictionaries in C# code instead of in XAML.
- Hold a single resource dictionary per Skin, and add content into App.xaml directly to preserve merged dictionaries hierarchy starting at App.xaml level.
- Use XamlReader.Load() method to load a Skin from a loose XAML file.
Usually, this will be just the beginning and you will need to hand tailor the code much more for the specific needs of your App. But I hope I gave you a decent head start 🙂
Here are some more articles on Skinning / Theming:
- Creating a Skinned User Interface in WPF by Josh Smith
- https://www.codeproject.com/Articles/22575/WPF-Themes-and-Skins-Engine by Tomer Shamam
- On loading Windows Themes https://stackoverflow.com/questions/2075720/windows-7-theme-for-wpf
More on WPF Resources:


