
The previous blog post introduced the wonderful world of Visual Studio extensions.
Let’s start and do some coding. During the tutorial we are going to build a VS extensions called CodyDocs and place it on [GitHub](https://github.com/michaelscodingspot/CodyDocs ).
CodyDocs will save code documentation in a separate file and the extension will allow to view and edit the documentation in the editor itself.
In the first part, we’ll start with a simple “Hello World” program. We’ll create an extensions with a Menu item that does something. I’ll make things a bit more interesting and make the menu item act as a checkbox.
Starting the project
A great way to start any feature is to add a button to disable it. So first order of business: Add a checkable menu item to Enable and Disable the feature our extension performs.
First, we’ll create a new project with File -> New Project -> VSIX project and call it CodyDocs.
Now to be able to enable and disable the feature, we need the ability to store a bool value that stores our setting.
Create a Settings file
A settings file is where you can save your application and user settings (Very much like app.config). We can add one such item by Right clicking on project -> New Item. Then Visual C# Items -> General -> Settings File. Let’s call it GeneralSettings.
In the designer we add a new setting:
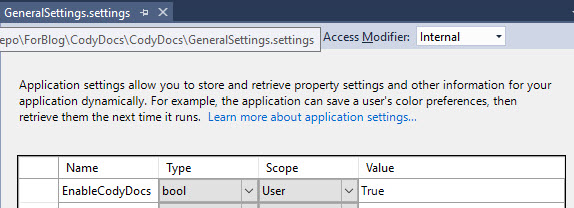
We can now get or set this option with GeneralSettings.Default.EnableCodyDocs.
Next, I want a menu item to be able to toggle this setting.
Add Menu item to the VS extension
The following tutorial relates to the new AsyncPackage , which loads packages asynchronously. To see the tutorial for the old Package , go here .
A menu item is a type of Command in the Visual Studio extensions world. A Command is a piece of functionality you can add to your extensions. It can be invoked from a menu item, toolbar, context menu or from code.
A Command is a part of VSPackage. VSPackage is defined as a software module that extends Visual Studio. A VSPackage can contain many commands.
So first of all, we need to add a VSPackage.
- In Solution Explorer add new item from C# Items -> Extensibility -> Visual Studio AsyncPackage and call it CodyDocsPackage. Two files should’ve been added to the solution: CodyDocsPackage.cs and CodyDocsPackage.ico in Resources.
- To create the menu item, we’ll need to create a Command. In Solution Explorer add new Custom Command with C# Items -> Extensibility -> Custom Command and call it EnableDisableCodyDocsCommand. You’ll see two files were added: EnableDisableCodyDocsCommand.cs and CodyDocsPackageAP.vsct.The .vsct file created is the Visual Studio Command Table. It’s an XML file that describes the structure of the commands and their initial state. If we go to CodyDocsPackage.vsct, we’ll see that the Command was added to the package in <Buttons>.If you look at the EnableDisableCodyDocsCommand.cs file created, there will be a method Execute. Here you can place any custom code and it will be called whenever the command is invoked.
- The command right now isn’t associated with any user action in Visual Studio. We need to add a menu item that will invoke our command. This is configurable in the .vsct file. Open CodyDocsPackage.vsct. At the end of the file, there is a <Symbols> node that contains several <GuidSymbol> nodes. In the node named guidCodyDocsPackageCmdSet, add a new symbol TopLevelMenu, as follows: ```
- Create a <Menus> node in the <Commands> node, just before <Groups> as follows: ```
- In the <Groups> section, find the <Group> and change the <Parent> element to point to the menu we just added (both guid and id attributes): ```
- Now just find the Button and change the text of our menu item: ```
Run the extensions. You should see this:

Turn our menu item into a Checkbox
Now to turn our menu item into a checkbox that enables and disables our setting.
VS includes a functionality to Check and Uncheck a MenuCommand with the Checked property.
In our EnableDisableCodyDocsCommand.cs, change the constructor and the command callback to:
<pre class="scroll:true lang:default mark:16 decode:true">private EnableDisableCodyDocsCommandAP(AsyncPackage package, OleMenuCommandService commandService)
{
	this.package = package ?? throw new ArgumentNullException(nameof(package));
	commandService = commandService ?? throw new ArgumentNullException(nameof(commandService));

	var menuCommandID = new CommandID(CommandSet, CommandId);
	var menuItem = new MenuCommand(this.Execute, menuCommandID);
	menuItem.Checked = GeneralSettings.Default.EnableCodyDocs;;
	commandService.AddCommand(menuItem);
}

private void Execute(object sender, EventArgs e)
{
	GeneralSettings.Default.EnableCodyDocs =
		!GeneralSettings.Default.EnableCodyDocs;
	GeneralSettings.Default.Save();
	var command = sender as MenuCommand;
	command.Checked = GeneralSettings.Default.EnableCodyDocs;
}
The constructor sets the initial state. Execute will toggle the setting state and update the Command’s Checked value accordingly.
That’s it. Now pressing on the menu item will toggle the icon and will change our EnableCodyDocs setting.
Well, there’s one final touch. Visual studio doesn’t load the Command until first use. Which means, our Command’s constructor won’t be called and our menu item will be in its default state – unchecked, regardless of the setting’s value.
We need to make our Command to initialize at Visual Studio startup. To do that, we need to make our VSPackage to initialize at startup. This is done with the ProvideAutoLoad attribute in the package class file CodyDocsPackage.cs like this: (More on ProvideAutoLoad )
<pre class="lang:default mark:6-7 decode:true">[PackageRegistration(UseManagedResourcesOnly = true)]
[InstalledProductRegistration("#110", "#112", "1.0", IconResourceID = 400)] // Info on this package for Help/About
[Guid(CodyDocsPackage.PackageGuidString)]
[SuppressMessage("StyleCop.CSharp.DocumentationRules", "SA1650:ElementDocumentationMustBeSpelledCorrectly", Justification = "pkgdef, VS and vsixmanifest are valid VS terms")]
[ProvideMenuResource("Menus.ctmenu", 1)]
[ProvideAutoLoad(VSConstants.UICONTEXT.NoSolution_string, PackageAutoLoadFlags.BackgroundLoad)]
[ProvideAutoLoad(VSConstants.UICONTEXT.SolutionExists_string, PackageAutoLoadFlags.BackgroundLoad)]
public sealed class CodyDocsPackage : Package
We have the attribute twice: When there’s no Solution, and when Solution exists. Which covers all cases. Also, note the PackageAutoLoadFlags.BackgroundLoad flag. This important flag states that our packages can initialize asynchronously on a background thread. Packages that aren’t initialized asynchronously will stop being supported at a future Visual Studio version.
Summary
We created a simple extension with a check-able Menu item. For that, we created an AsyncPackage and a Command as part of that package.
That’s a pretty simple “Hello World!” intro to VS Extensibility. I promise we’ll dig in into much more difficult and interesting stuff.
In the next tutorial we’ll start working on the core functionality of the extension: Highlight a piece of code in the editor and add the documentation.
Source code
The source code is available on GitHub , with Tag Part2. So to clone and checkout to the specific tag, write:
<pre class="theme:powershell lang:default decode:true ">> git clone https://github.com/michaelscodingspot/CodyDocs.git
> cd CodyDocs
> git checkout tags/Part2
> nuget restore
Tutorial Table of Contents:
- Part 1: Introduction to VS extensibility
- Part 2: Add Menu Item (You are here)
- Part 3: Add command to context menu and get selected code
- Part 4: Show a popup Window
- Part 5: Highlight code in Editor
- part 6: Follow a span of code with TrackingSpan
- Part 7: Insert buttons between text characters with Adornments
- Part 8: Add UI in the indicator margin with Glyphs


