
In part 2 of the tutorial we created a simple VS extension with a single Menu item.
The extension will eventually be able to add code documentation in a separate file (.cs.cdocs) and view it in a nice Heads-Up display. The tutorial explains every step of the way to build such an extension.
For starters, we need the ability to select a piece of code and add documentation, which is what we’ll be doing here.
We’re going to add a new Menu item to the code editor’s context menu. When invoked, the extension will find the selected text and its Span (From where to where). Then, it’s just a matter of showing a nice Popup window for the user to edit the documentation.
Tutorial Table of Contents:
- Part 1: Introduction to VS extensibility
- Part 2: Add Menu Item
- Part 3: Add command to context menu and get selected code (You are here)
- Part 4: Show a popup Window
- Part 5: Highlight code in Editor
- part 6: Follow a span of code with TrackingSpan
- Part 7: Insert buttons between text characters with Adornments
- Part 8: Add UI in the indicator margin with Glyphs
Adding to code editor’s context Menu
First, we need to add a new Command DocumentCodeSpanCommand, which will later be seen from the context menu accessed. So let’s add a new Custom Command to our project.

In our package’s command table CodyDocsPackage.vsct we can see a bunch of stuff was added automatically.
- A new <Group> node called guidCodyDocsPackageCmdSet1
- A new <Button> node with id=”cmdidDocumentCodeSpanCommand”
- A new <Bitmap> which we need to delete since we don’t need an icon for this button.
- A new symbol node: ```
5. Another <GuidSymbol> node for the icon, which we will also delete.
Let’s rename MyMenuGroup to EditorContextMenuGroup for good order’s sake. We need to do this in 3 places: The new <Group> node added, in the new <Button> added and in the new <GuidSymbol> added.
Now we need to make several of changes to have our command show in the code editor’s context menu:
- In the new <Button> node. remove the <icon> node and change the text to “Add documentation”. ```
```
- To make the button appear in the right context menu, we need to change the Group’s parent to the specific context menu we need. The editor’s Context menu ID is IDM_VS_CTXT_CODEWIN. So the <Group> node should be: ```
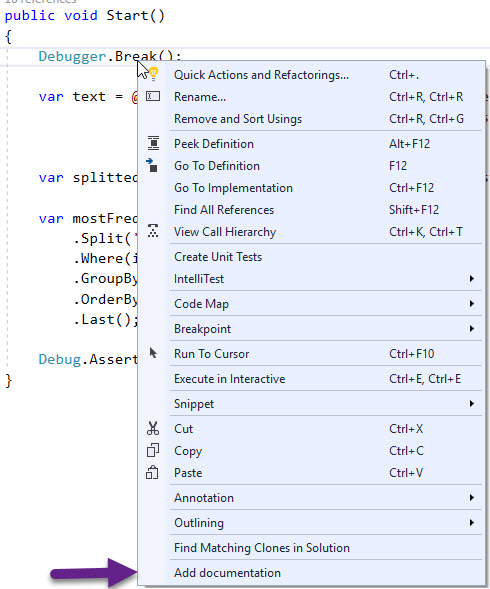
That’s it. Run the project with F5, open any code file and right click to open the Context menu. You should see this:
There are many context menus and drop down menus in Visual Studio. Here, we used IDM_VS_CTXT_CODEWIN. To add commands to a specific context menu, you’ll have to know the GUID:ID of that menu. VS 2015 SP1 introduced a feature to get the relevant GUID:ID. See this thread in StackOverflow for a nice explanation.
We want our new command to be able to add documentation to currently selected text. For that, we need to find out the selected text and the current file.
Visual Studio provides the necessary API through the VSPackage. Our VSPackage is in CodyDocsPackage.cs. You can see it derives from Package, which derives from IVSPackage, IServiceProvider and about 10 more interfaces. I’m not kidding, it really is:
public abstract class Package : IVsPackage, OLE.Interop.IServiceProvider, IOleCommandTarget, IVsPersistSolutionOpts, IServiceContainer, System.IServiceProvider, IVsUserSettings, IVsUserSettingsMigration, IVsUserSettingsQuery, IVsToolWindowFactory, IVsToolboxItemProvider, IVsToolboxItemProvider2
We will need to use System.IServiceProvider.
Get selected text
The Text View (or Editor pane) object is exposed in several ways. One interface representing it is IVsTextView. There are other useful interfaces like IWpfTextView which we will use in the future, but for our purposes we need IVsTextView.
We’ll use ISystemProvider to get the Text View as IVsTextView. With the interface, we can call GetSelection and GetSelectedText to get the Span and the text itself:
private TextViewSelection GetSelection(IServiceProvider serviceProvider)
{
    var service = serviceProvider.GetService(typeof(SVsTextManager));
    var textManager = service as IVsTextManager2;
    IVsTextView view;
    int result = textManager.GetActiveView2(1, null, (uint)_VIEWFRAMETYPE.vftCodeWindow, out view);

    view.GetSelection(out int startLine, out int startColumn, out int endLine, out int endColumn);//end could be before beginning
    var start = new TextViewPosition(startLine, startColumn);
    var end = new TextViewPosition(endLine, endColumn);

    view.GetSelectedText(out string selectedText);

    TextViewSelection selection = new TextViewSelection(start, end, selectedText);
    return selection;
}
Depends on how we selected the text, the “end” can come before the “beginning”. So we might need to switch between those to have the actual beginning first.
TextViewPosition and TextViewSelection are two simple structs to hold data and do the said switch.
<pre class="height-set:true height:250 lang:default decode:true">struct TextViewSelection
{
    public TextViewPosition StartPosition { get; set; }
    public TextViewPosition EndPosition { get; set; }
    public string Text { get; set; }

    public TextViewSelection(TextViewPosition a, TextViewPosition b, string text)
    {
        StartPosition = TextViewPosition.Min(a, b);
        EndPosition = TextViewPosition.Max(a, b);
        Text = text;
    }
}


public struct TextViewPosition
{
    private readonly int _column;
    private readonly int _line;

    public TextViewPosition(int line, int column)
    {
        _line = line;
        _column = column;
    }

    public int Line { get { return _line; } }
    public int Column { get { return _column; } }


    public static bool operator <(TextViewPosition a, TextViewPosition b)
    {
        if (a.Line < b.Line)
        {
            return true;
        }
        else if (a.Line == b.Line)
        {
            return a.Column < b.Column;
        }
        else
        {
            return false;
        }
    }

    public static bool operator >(TextViewPosition a, TextViewPosition b)
    {
        if (a.Line > b.Line)
        {
            return true;
        }
        else if (a.Line == b.Line)
        {
            return a.Column > b.Column;
        }
        else
        {
            return false;
        }
    }

    public static TextViewPosition Min(TextViewPosition a, TextViewPosition b)
    {
        return a > b ? b : a;
    }

    public static TextViewPosition Max(TextViewPosition a, TextViewPosition b)
    {
        return a > b ? a : b;
    }
}
TextViewSelection now holds information about the Span and the Text of the selected text.
Get edited file (the Active Document)
We’re moving along pretty quickly. We now need to get the file path of our edited file. This isn’t too hard. We’ll use IServiceProvider again:
private string GetActiveFilePath(IServiceProvider serviceProvider)
{
    EnvDTE80.DTE2 applicationObject = serviceProvider.GetService(typeof(DTE)) as EnvDTE80.DTE2;
    return applicationObject.ActiveDocument.FullName;
}
As you can tell by now, Visual Studio exposes a pretty huge API for extensions. Microsoft is constantly working to improve the API and they keep adding new wrappers and services for our convenience. As a result there are sometimes different classes and services to achieve the same thing. The reason being Microsoft maintains backward compatibility, so old wrappers and services aren’t really deleted.
So it’s not all bad. Most of the API’s are pretty intuitive and there are a lot of good blog posts on extensibility, although the overall documentation is lacking in my opinion. Most importantly, the API works well and you can achieve pretty much anything you can think of, just a matter of digging in hard enough and long enough.
Tying it all together
We need everything to work from our context menu command. So going to our Command file DocumentCodeSpanCommand.cs, let’s place our logic into MenuItemCallback:
private void MenuItemCallback(object sender, EventArgs e)
{
    TextViewSelection selection = GetSelection(ServiceProvider);
    string activeDocumentPath = GetActiveDocumentFilePath(ServiceProvider);
    ShowAddDocumentationWindow(activeDocumentPath, selection);
}
ServiceProvider is a property automatically generated in any command. It simply references to our VSPackage, which implements IServiceProvider.
ShowAddDocumentationWindow we’ll cover in the next tutorial post – Showing a popup Window.
Summary
We learned to add a Command to editor’s context menu, how to get current selected text and how to get the active document.
We started working with some of the most important pieces in a VS extension, like IServiceProvider and IvsTextView.
In the next few tutorials we’ll start playing with some UI. Opening popup windows and showing some heads up display in the editor itself.
Source code
The source code is available on GitHub , with Tag Part3. So to clone and checkout to specific tag, write:
<pre class="theme:powershell lang:default decode:true">> git clone https://github.com/michaelscodingspot/CodyDocs.git
> git checkout tags/Part3


