
Tutorial Table of Contents:
- Part 1: Introduction to VS extensibility
- Part 2: Add Menu Item
- Part 3: Add command to context menu and get selected code
- Part 4: Show a popup Window
- Part 5: Highlight code in Editor
- Part 6: Follow a span of code with TrackingSpan
- Part 7: Insert buttons between text characters with Adornments
During the tutorial we are going to build a VS extensions called CodyDocs and place it on GitHub . Each tutorial part is a standalone tutorial on a specific topic and can be viewed individually. CodyDocs will save code documentation in a separate file and the extension will allow to view and edit the documentation in the editor itself.
Part 8: Add UI in the indicator margin with Glyphs
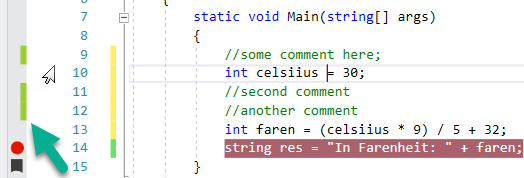
VS Extensibility allows to add UI in the so called “Indication Margin”. This is the vertical bar on the right where you can place breakpoints, bookmarks and such:
![]()
We’ll add a little UI of our own, wherever there’s a comment
To do that, we’ll need to:
- Create a Tagger that provides IGlyphTag
- Create a GlyphFactory that draws the Glyph UI element
So let’s start.
Step 1: Create a Tagger that provides IGlyphTag
The Tagger is the class that “tells” Visual Studio the text spans (ranges) where the effects (like our Glyph) should be drawn.
We’ll need to create 2 classes for that. First, an ITaggerProvider:
[Export(typeof(ITaggerProvider))]
[ContentType("code")]
[TagType(typeof(CommentTag))]
class CommentTaggerProvider : ITaggerProvider
{
    public ITagger<T> CreateTagger<T>(ITextBuffer buffer) where T : ITag
    {
        if (buffer == null)
        {
            throw new ArgumentNullException("buffer");
        }

        return new CommentTagger() as ITagger<T>;
    }
}
The ITaggerProvider creates ITagger for each Text View in Visual Studio. For example, when opening a file in a new tab.
Now the ITagger and the IGlyphTag:
internal class CommentTag : IGlyphTag { }

internal class CommentTagger : ITagger<CommentTag>
{

    private const string _searchText = "//";

    IEnumerable<ITagSpan<CommentTag>> ITagger<CommentTag>.GetTags(NormalizedSnapshotSpanCollection spans)
    {
        foreach (SnapshotSpan curSpan in spans)
        {
            int loc = curSpan.GetText().IndexOf(_searchText);
            if (loc > -1)
            {
                SnapshotSpan todoSpan = new SnapshotSpan(curSpan.Snapshot, new Span(curSpan.Start + loc, 2));
                yield return new TagSpan<CommentTag>(todoSpan, new CommentTag());
            }
        }
    }

    public event EventHandler<SnapshotSpanEventArgs> TagsChanged
    {
        add { }
        remove { }
    }
}
The ITagger creates CommentTag items wherever we need to draw the Glyph. We simply look for “//” in the given span and return a TagSpan marking the location of “//”.
The following part will actually draw the UI in the lines where CommentTags are created.
Part 2: Create a GlyphFactory
The GlyphFactory will go over all the CommentTags that we created with the Tagger and tell VS to draw the Glyphs. We’ll need to create 2 classes. First, the GlyphFactoryProvider:
[Export(typeof(IGlyphFactoryProvider))]
[Name("CommentGlyph")]
[Order(Before = "VsTextMarker")]
[ContentType("code")]
[TagType(typeof(CommentTag))]
internal sealed class CommentGlyphFactoryProvider : IGlyphFactoryProvider
{
    public IGlyphFactory GetGlyphFactory(IWpfTextView view, IWpfTextViewMargin margin)
    {
        return new CommentGlyphFactory();
    }

}
This creates a GlyphFactory for each Text View in Visual Studio.
Now for the GlyphFactory itself:
internal class CommentGlyphFactory : IGlyphFactory
{

    public UIElement GenerateGlyph(IWpfTextViewLine line, IGlyphTag tag)
    {
        var lineHeight = line.Height;
        var grid = new System.Windows.Controls.Grid()
        {
            Width = lineHeight,
            Height = lineHeight
        };
        grid.Children.Add(new Rectangle()
        {
            Fill = Brushes.YellowGreen,
            Width = lineHeight / 3,
            Height = lineHeight,
            HorizontalAlignment = HorizontalAlignment.Right
        });
        return grid;
    }

}
This is pretty straightforward, but some things to note:
- The UI element created is centered in the middle of the line, both vertically and horizontally.
- The width and height of the glyph bar are obtained with line.Height.
- Here I created in code a WPF Grid and a Rectangle, but usually you’ll want to create a WPF Control in a separate file.
More sources:
If you’re unfamiliar with Taggers, TaggerProviders or MEF (All the [Export] attributes), you can start with Part 5: Highlight code in Editor .
This tutorial is based on Microsoft’s sample on Glyphs .
The result in CodyDocs:
Instead of always highlighting the documented text, the code is highlighted only when hovering over the Yellow-Notepad adornment. With the Glyphs, the user should understand what is being documented without the highlight disturbing the document:
The code is available on [GitHub](https://github.com/michaelscodingspot/CodyDocs). To checkout to the extension code right after adding the popup window, use the Tag **Part8**:<pre class="theme:powershell lang:default decode:true ">git clone https://github.com/michaelscodingspot/CodyDocs.git
cd CodyDocs
git checkout tags/Part4


